My Story Layout

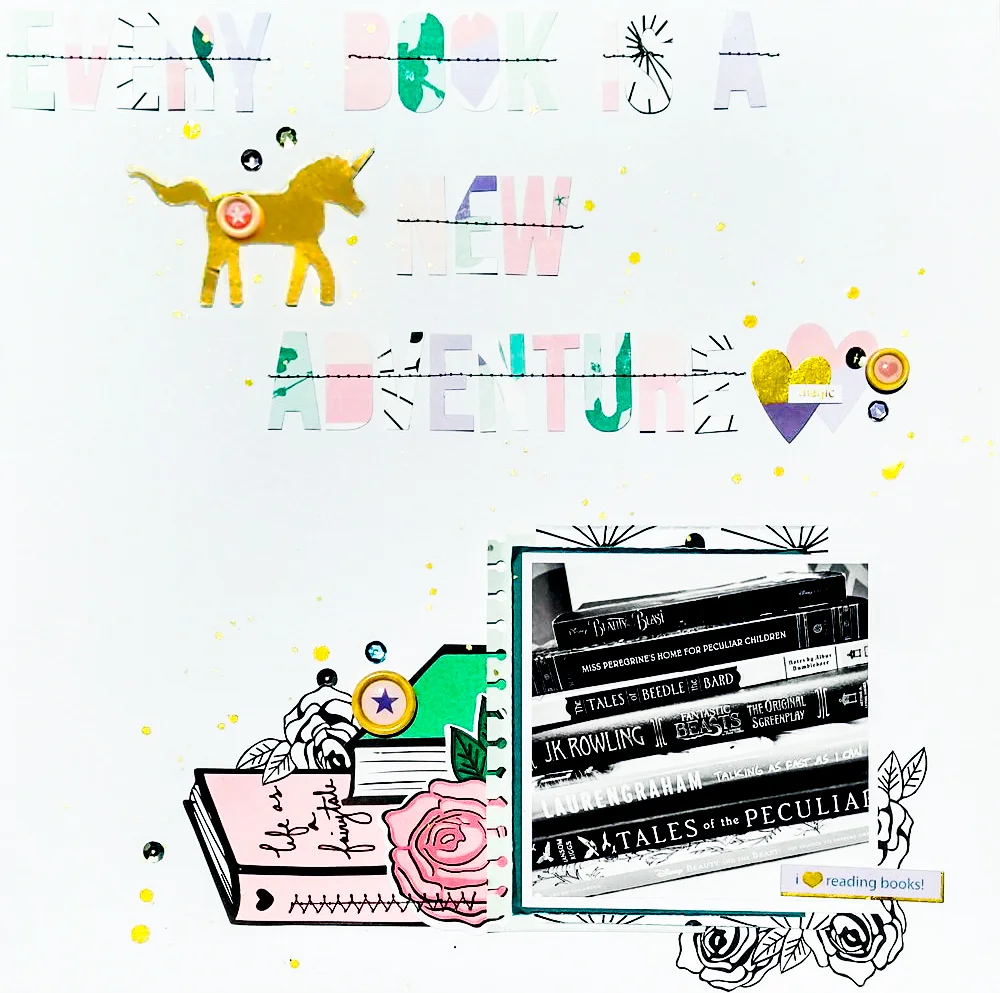
Hi Everyone! It's Andrea here today and I want to share with you a fun layout that I did using the "Storytime" collection! Yay!!! I love the Storytime kit! It is such a beautiful collection of pretty papers and embellishments that is so lovely to work with and feel very dreamy! I wanted my layout to feel very dreamy so it just works perfectly! 

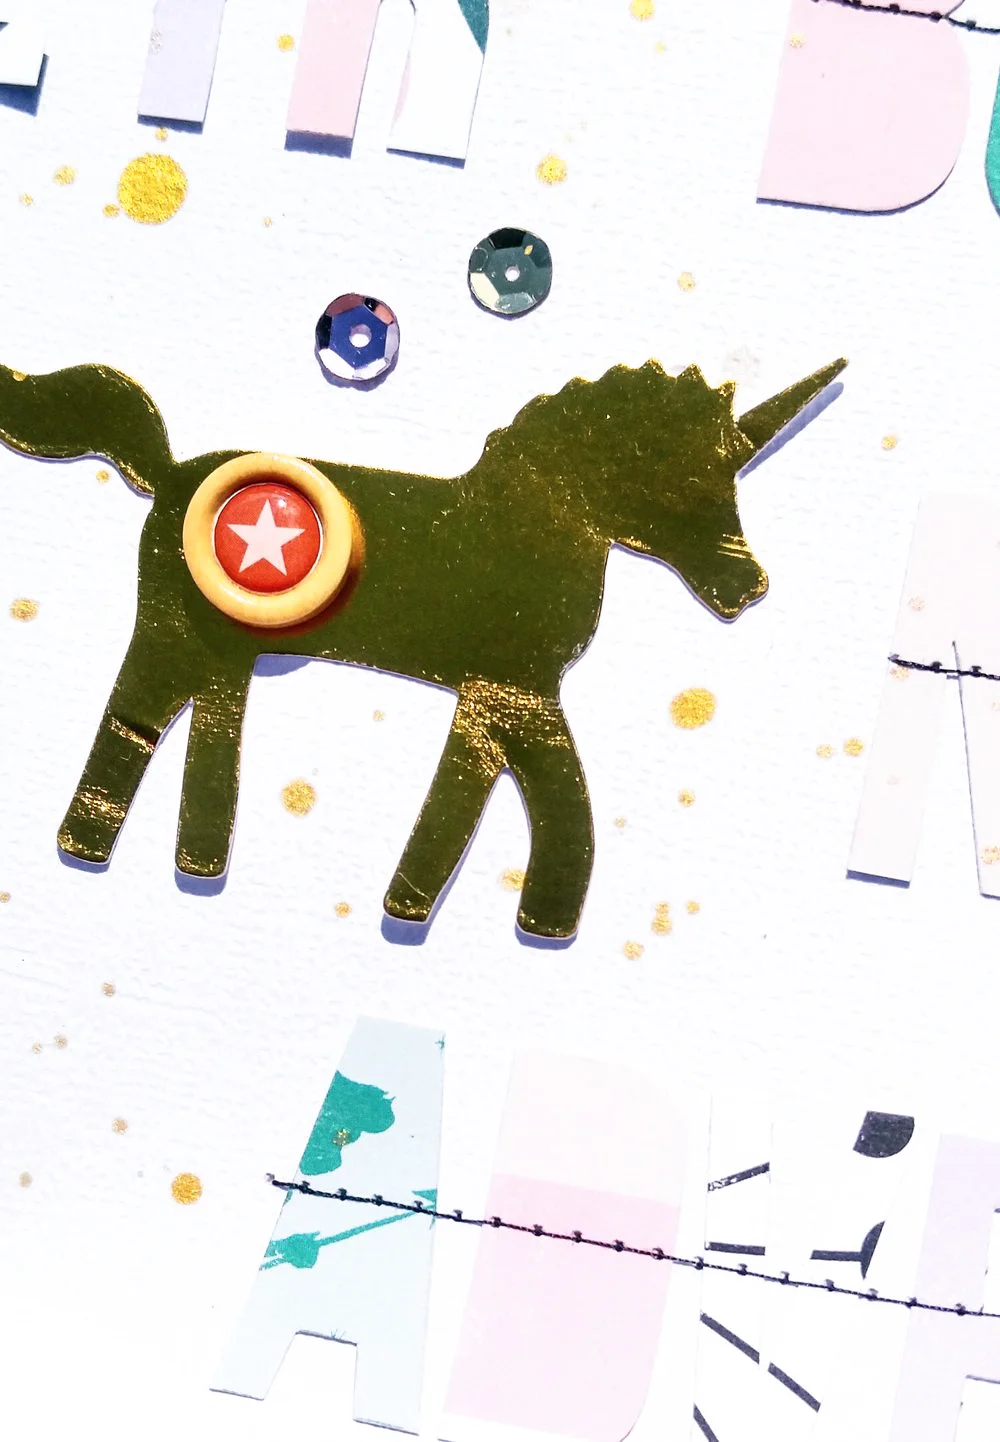
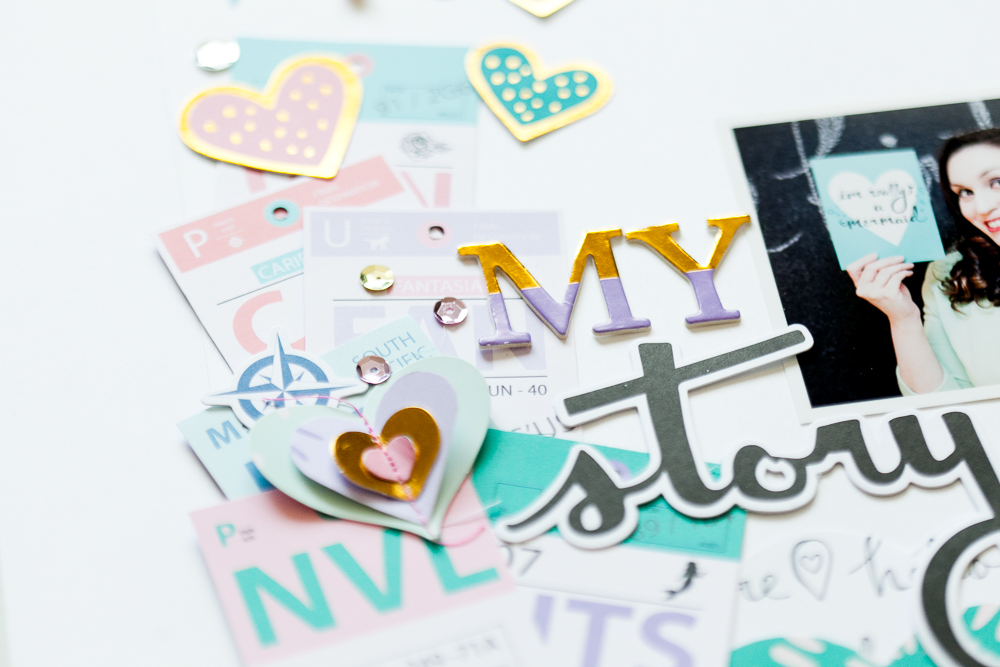
So for this layout, I wanted to create something about my life and my story right now -- specifically about how I "live my life as a fairytale".  At the top, you can see that motto written out and paper-clipped to the page along with an ephemera piece from the kit that says "summer magic" and a little piece of pink unicorn patterned paper. And then the title of "My Story" is spelled out using one of the ephemera word script pieces and also the gorgeous gold-foiled alphabet chipboard stickers that come in the kit to spell out "my". 

The story I am expressing in this layout, is basically a look at my outlook right now. It has been quite difficult lately with my health and all the pain, but at the same time, I refuse to let it break me or stop me from dreaming and believing! I maintain my positive outlook and continue to "live my life as a fairytale" and believe in a brighter tomorrow! I think I express these ideas through different items on the page... For example, I used the travel tickets from the patterned paper and fussy cut those tickets out and spread them across the side of my page. Each ticket is to a different fairytale place (like "under the sea" from The Little Mermaid, "Motonui" from Moana, "Never-Neverland" from Peter Pan, etc), I think they help express how I am still a dreamer despite the pain...that I escape from the pain and constantly being stuck in bed through my imagination and creativity! I may often be stuck in one place, but in my heart I have traveled to "Never-Neverland". I am stuck in pain but am also in a beautiful, enchanted world, because I focus on all the beauty in life and I laugh with my loved ones and am playful and silly, and I write and read and draw and paint and craft and create beautiful things...I see and experience a world of wonder! :-)

At the bottom of the page, you see scallops of patterned paper that I layered on top of each other. One of the patterns says "you are here" on it. I wanted to put that there and then have the different fairytale tickets flowing up off of it with all the pretty sequins and hearts and other little goodies flowing up to the top of the page, to show that even though I am here...stuck inside my house so much of the time, that I am also living in a beautiful world of love and laughter and beauty that is like a magical, fairytale world. I am rooted here and yet, I float and fly on beautiful dreams and ideas! It may seem like a silly thing, but I think it is true and it is just the kind of person I am.

In the picture you can see me holding up a divider (from the kit actually), that says "I'm really a mermaid". And I will be speaking on that sentiment more later, in an upcoming project that I am starting called "the mermaid project". In short, I consider myself to be a girl who is really a mermaid...because in the original story by Hans Christian Anderson, The Little Mermaid, she is always in pain...she is has been transformed into a human and the cost was that her new legs would always hurt and when she walked it felt like she was walking on glass. For this reason, I have always felt that way...that the pain is because I am in human form...but really I am a magical creature...a mermaid. I am stuck in the pain in my body, but my heart and my mind live in a world of beauty and magic and that is who I really am!

I hope that you are inspired by this layout and please stay tuned to hear about my upcoming project, "the mermaid project" which I will be detailing more soon here on the blog and on my YouTube channel! Have a good day and remember to "live your life as a fairytale"!


"Storytime" YouTube video :-)

Hi Everyone! I did a kind of unboxing or haul video on YouTube channel of my "Storytime" kit/collection,  earlier this month, and I just thought I would share it with you here and let you know in case you haven't seen it yet, so you can check it out! 

I absolutely LOVE this collection and am having fun playing with it! The mermaids are gorgeous and so is all the great beachy stuff and travel/adventure goodies!  I also love the unicorns, fairies, and references to stories and books and of course, fairytales!!! 
 

I will be sharing with you a cool new project using the "Storytime" kit soon and there will be videos of that on my YouTube channel, so stay tuned for that! 

Hope you all are having a great July, enjoying your summertime, and remembering to "life your life as a fairytale"! Hugs!!!

xoxoxo -- Andrea

Wondrous

Good morning everyone!

Sarah here today to share a layout I made with you using the Storytime kit.

This layout is extremely simple, but I loved the way it turned out. The alpha set in this months kit is gorgeous, So I decided to use it as a main feature on my page. 

I had chose these cute little picture of my youngest daughter in her bouncy seat.I put a lid over the area that I wanted my picture and pulled out the alpha and started laying them all around the page. Laying them on there sides, up right and even some upside down.

I left little places here and there open big enough in the letters to put little pieces of ephemera and some of those cute little wooden buttons.

I added a white boarder around my photo and them added a little bit of the light blue, polka dot paper behind my photo and fussy cut out a little pink camera and added it to the bottom right of the photo. I added a few lines and journaled  about this pretty little goofy girl and how I hope she stays filled with wonder about everything like she is now.

Thanks so much for checking this layout out and make sure to come back and check out what all the other ladies make and make sure to check out the gorgeous new July kit!

July's "Sweet!" Kit Reveal: Part 2 (12x12 Paper)

Hello there everyone! Today we want to share with you the next look at our upcoming “Sweet!” collection! This is the second part of our reveal, and it is a look at the beautiful, fun and vibrant 12x12 patterned papers within our July kit!

I really love the color-scheme for “Sweet!”! I think the best way to describe the color-scheme may be “rainbow-y”! Yes, the colors for this collection are like a beautiful rainbow! In this collection, you get light and also bright pinks and watermelon-red and awesome teals and bright blue and some fun peachy colors...oh, and some fun in the sun yellow too! I really wanted this collection to evoke a bright and playful, happy summertime feeling and I think the variety of bright and vibrant colors in “Sweet!” really helps to do that! 

The color-scheme isn't the only thing bringing the summertime joy in “Sweet!”, there are so many cute and happy patterns that just work perfectly for documenting your summertime adventures! Whether those adventures are at the beach, by the pool, in the park (like maybe a Disney park perhaps :-) )...or hanging out at home, or shopping at the mall, or at a fair, or a concert, or a candy store, or wherever really! It is just a great collection to celebrate all the fun summer things that you like to do! 

I think the collection is so perfectly named given all the fabulous “sweets” that you can find throughout “Sweet!”! For example, there is the ice-creams and popsicles patterned paper, the pink lollipop patterned paper, and the paper called “Bubble Gum, Cherry Pop, Let's Go to the Hop” which has a mix of different sweets on it (like cotton candy, heart candies, ice-cream, lollipops, popsicles and also words like “yum” and “super sweet”)! 

03-Sweet-12x12-Paper.jpg
23-Sweet-12x12-Paper-with-stroke.jpg

Oh and how cute are the sweet pieces that you can find on the cut-apart sheets?! I love that 4x6 ice-cream card and the cut-apart piece with the cotton-candy girl on it...she has a bow...how sweet is that?!!

Talking about the cut-apart sheets, I am loving the ones that we have this month! I think the Rainbow Unicorn card is my favorite for sure!!! I am also really digging that film-strip of pop-art girl's faces with the heart sunglasses that say “xo,xo” on them! So cool!

I think you are going to love the watercolor patterned papers that we have for this kit! I think the rainbow one is gorgeous! I also really love the paper titled “Summer's On” which has that cool painted pattern on it that kinda looks like sprinkles or confetti or something...so adorable!

Let's talk about some of the super versatile patterns that we have this month, shall we? I think the ledger is definitely a favorite! I mean, who doesn't love a good ledger paper?! It is such a great staple patterned paper that can really work for so many stories! I think it would be so perfect to journal about your summertime adventures! It would be really awesome to make a Summer Bucket-list on that too and then you could list out what you want to do on the ledger and put pics next to each item on the list to document all your summer fun! 

Oh, and there are so many awesome and really versatile patterns that are just super duper cute and graphic patterns that you can use for anything! I love the pink on pink chevron pattern, the red and pink triangle pattern, the cute polka dot patterns that come in the collection, the green diamond pattern, and the really cool blue scallop pattern called “Be Yourself” that kinda looks like little blue and pink rainbows that are just repeated like scallops or scales across the page! Those last two patterns have a really fab “morrocan” kind of vibe (think Agrabah...hint, hint, wink, wink), don't they?! 

Definitely another favorite pattern of mine in the collection is the one titled “I heart unicorns” which has lovely unicorn cameo silhouettes repeated across it! So magical and lovely! I really do heart unicorns!!! Don't you?!

Another really fun pattern in the collection that I am excited to work with is the “Cool like Me” pattern with the sunglasses on it. It is just so perfect for summertime! And on the back of that one there is a really teal cute bow patterned paper that is so cute too!

I decided to do a fun bird pattern too that has a bit of a tropical vibe and a little bit of a "love bird" feel to it too!

And there are definitely some patterns in “Sweet!” that are giving off some really great vintage vibe, like the retro style, beach-ball looking pattern that is called “Surf, Sun, Sand”. It is such a bright and vibrant pattern with its multi-colored circles...so cute!

Talking about vibrant and colorfol patterns...there are certainly a lot in this collection! One of my faves is the one titled “Sweet!” like the collection name itself, which has the rainbow watercolor on one side, and on the other there is a really cool and also colorful script pattern that is a kind of love-letter to summer itself! This is absolutely one of my favorites! I really enjoy the underlined and circled words and phrases, in the varying colors of the collection, that just really make the pattern and the sentiment of the letter POP off the page!!!

Alright, well, I hope you have enjoyed this look at the patterned papers within the “Sweet!” collection! These patterns are making me so happy and excited for summertime adventures right now and they are so cute and sweet...I think I may be developing a sweet-tooth...oh, wait, I already have one...which explains the oreo in my hand...hahahahaha! Ok, hope you enjoyed part 2 of our “Sweet!” reveal, stay tuned for part 3 where we show you the fabulous planner dividers...and then the wrap up of the reveal which will go over everything in the collection including the reveal of all the fairytale inspiration that went into the making of “Sweet!” Ok, byeeeeee!!!!

My Goofy Princess Layout

 Hey Everyone! I hope your week is going good so far!

Sarah here, to share with you a layout I made of one of my goofy little girls, with Junes "Storytime" kit. I'm a huge fan of that light teal paper with white dots and of the water color looking paper, so I thought I would pull those two to start my layout.

I cut a few strips of the watercolor paper and a strip of the light teal and layered them at the top of my layout then started layering paper behind my photo. I cut a few pieces from one of the cut apart papers and added that into the layers.

To the left of my photo I added a pretty cut-file floral into the layers and moved onto the right side of my photo. I went into the ephemera pack and grabbed the cute little square with the two pretty mermaids and decided to cut the pink edge from around it and use it as a frame and keep the inside to use later. 

I added the frame to the right side of the photo and broke into the embellishments! I added a few of the heart ephemera pieces. I decide that I wanted to add a little cluster to the bottom of my layout, so I layered ephemera pieces there to, along with a little strip of purple paper and another cut-file.

I added some of those adorable wood buttons and sequins around my layout. I thought I was done and then decided that I wanted a little more color, so I broke out my water colors and pulled out my purple and splattered it around my layout.

Thanks so much for checking out this layout that I made and I hope you come back and check out what all the lovely Design Team ladies create!! And make sure to join us over on facebook too! 

July Monthly Spread with the Storytime Scrapbook Kit

Hi everyone! I wanted to share my monthly spread for July in my A5 planner. I used my Storytime kit, the July monthly calendar from the Magical Memory Planner class and the 4th of July printable from the blog to plan my month. Take a peek!

Here's the A5-sized free Fourth printable which I used as a cover for this month's spread. I added a few of the sequins you receive as part of the Happily Ever After kit. Just a couple of glue dots add an easy touch of festive sparkle!

This is what my July looks like! I used the July printable monthly calendar included in the Magical Memory Planner class and decorated it with things from the scrapbook kit. I do scrapbook sometimes, but I'm more of a planner girl. However, I'm always able to use my scrapbook items in my planner. It's really easy! 

On these pages, I made good use of my metal dies and punches. If you're like me, you have a lot of these in your scrapbooking stash. I use them all the time on my planner pages as well. You'll see that I die cut hearts and stars to use as a backdrop for certain days. The Mickey head is a punch I got at Joann's that I've had forever! So don't forget about your fun cutting tools. They have a place in your planner toolbox as well!

Here you can see I use quite a few 3D elements. For a long time, I was too scared to use them, worrying it would bulk up my planner. Now, I use them happily and just keep fewer pages in my planner. I never ended up looking back or forward in the calendar so I put those in another binder, popped it on my bookshelf and embraced the 3D!

And don't forget to check your sticker page for useable stuff! I wanted to cover the notes section there on the right side and luckily, there was a sticker waiting for me to use on the label sheet! The "this is my story" banner is from the cut apart sheet (I'm A Mermaid paper). I used strips of scrapbook paper to mark off things that lasted longer than a day. This month, there was quite a few of those (my husband's vacation, D23 and San Diego Comic Con) so there's a lot of paper in that area! I added the Mickey head to break it up a bit and as I mentioned, he's made from a punch and cut from scrapbook paper.

Lastly, you'll see the event stickers! I'm a real perfectionist so with things that I'll look at frequently, like my monthly calendar, I like to make labels for my events rather than hand writing them. I do this by opening up a text document, typing everything up and then printing it on sticker paper. From there, it's just a few minutes of cutting and sticking and you're done! Easy peasy and I really like the look!

I hope you all enjoyed this peek into my planner and that one of my tips will help you in future crafting. Until next time, happy scrapping!

Is it summer yet ?

Hey there ! It's Mindi here with you today. I have another pocket page post for you. This one started with inspiration from the fun Summer filler card. I knew that I wanted to use it and then everything else came into place. 

IMG_5798.jpg

Since the summer filler card was vertical I needed a pocket page that could accommodate it. This particular week was the last week in May. The last week of school. I didn't have that many photos so I decided to use this side for the week and fill in the other side with some other photos. I added some simple embellishments to the top of the card and then added the dates of the week on the bottom. 

Most of these photos were from school events. This circle photo was from Memorial Day. We went to a pool party where the kids swam in the pool. I used a circle punch on the photo and added some sequins on the bottom. The photo next to it is of Noah on field day at school. 

On Thursday I participated in a sixth grade parent/student baseball game. It was so funny and fun all at the same time. I snapped a photo of me in the outfield during one of the innings. I wanted to add in my story in the empty space on the photo. So I made a text box in photoshop and added in to the photo. Finishing it off with that hashtag. 

I created this journaling card using a combination of gold letters, and parts from the kit. It holds lots of happenings from the week. 

I am so glad that summer is here now and that school is out. Now that last week of school is documented and not forgotten. Until next time everyone. 

Every Book is a new adventure

Good morning everyone! I hope you had a great 4th of July with friends and family. I was happy that I got to spend it with both and we all had an amazing time!

So this week's theme for me was "Books" and lucky for me, I just got a few new book and can't wait to start reading. For me, I love reading books that draw you in and make you feel like you're in a completely different place! So I choose my title with that in mind. 

I decided that I wanted to do block lettering with my title, so I pulled bits from different papers in this months kit and started to cut my title out. I added a very little bit of adhesive to the letters and placed them where I wanted and them I sewed through them, I wanted them to be able to lift off the page a little still, so I didn't add anymore adhesive to my letters.

I had taken my picture of my book already, so I started layering papers behind my photo. Knowing how I had done the title and running through my head what I wanted to do embellishment wise, I chose to put my photo to the bottom right of my layout.

Then I went to fussy cutting the pretty little books out of some of the planner inserts and layering them to the left of my photo along with some fussy cut roses and a beautiful rose ephemera piece.

I liked my layout at this point, but I wanted to use that gold unicorn so bad, so I decided to add little embellishment clusters in a few places around the title.

I added that cute little unicorn, I was dying to use! lol and then of course I had to use those new little wooden buttons that came in this months kit. They are adorable and add dimension and I just love them!

I added hearts to the right of my title. The gold foiling is so pretty! I also cut out a heart from one of the papers and added it, along with another wood button. I thought I would finish off my layout adding some gold Heidi Shine and some of the pretty sequins. I hope you're enjoying your kit this month and I hope that you enjoyed my layout today!

Special Day

Hello everyone! It's Enza, and today I'll be sharing my last project as guest designer for the Fairytale Club. I have loved creating with the Storytime kit this month. I can't get enough of its beautiful colors and patterns. Here is my layout:

To start, I backed a floral cut file with some of my favorite papers from the kit. The soft colors are perfect for this picture of my daughter and I.

Clusters of embellishments frame the bottom portion of the photo. I fussy cut some leaves from the "Belle" paper and just layered them in between hearts and sentiment stickers.

The big pink heart is from the cut-apart sheet. I just added some wood buttons on top of it for dimension.

To balance the page, I added another cluster of embellishments in the lower left corner. Again, lots of layers and a few sequins and enamel dots (from my stash) to complete the layout.

Thank you so much for stopping by! I hope you enjoy playing with the Storytime kit as much as I do!

Have a lovely day!

Enza