Home, Sweet Home with Allie

Hello there! It's Allie here today sharing a layout using the Everyday Wishes collection. Today's page focuses on hand-stitching!

There were so many items in the kit that would look so cute with accent stitching, but I settled on this fun castle from the planner kit! I love the castles Andrea often includes in each kit, because they are so perfect for all my Disney photos!

I stitched around the castle design, and then cut it out to create a beautiful focal point for my page. I used the gorgeous "Dreams Do Come True" paper as my background. I added tissue paper on top of it to help tone down the design and have the photo stand out.

I used a picture from our recent trip to Disneyland, but converted it to black and white so the Christmas colors in the photo wouldn't compete with the colors of the page. 

IMG_6653.jpg

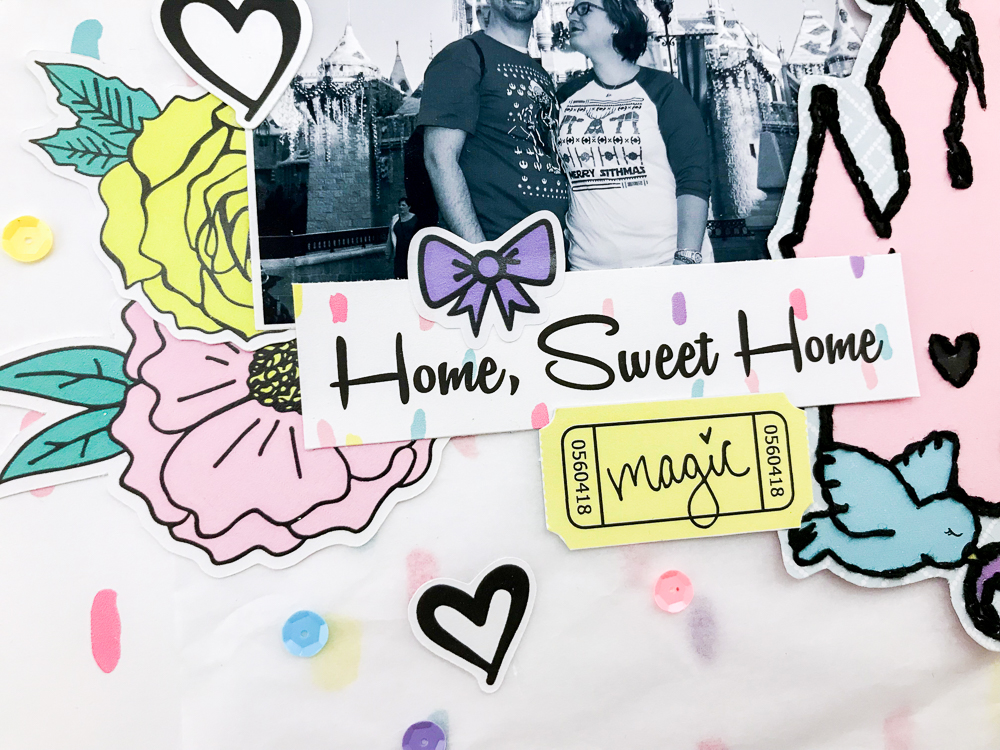
Finally, I finished off with embellishments. There are so many die cuts and stickers that it was hard to choose! I love the way it turned out. I had so much fun using all the beautiful patterns and colors. Thanks for joining me today!

Hello Alice with Carrie

Hello Everybody!  Today I have a short video where I flip through a mini book I put together using the amazing Everyday Wishes Kit!!  A friend of mine dressed as Alice from Alice In Wonderland during Mickey's Halloween Party last year and I took some super fun photos of her as the two of us explored Disneyland together.  As soon as I saw all the beautiful blues, flowers, and pops of color in the Everyday Wishes Kit I knew it would be the perfect product to use with my photos!....And so a mini book was born lol!!

In the video I show how I used Alice In Wonderland themed Instax film and share the finished Instax size pocket page which I altered to fit into a 4x4 album.  There are also a couple fun shaker pockets, lots of layering, and even two "floating" photos.

I hope you enjoy this project share.  Have a lovely day!

Cheers!! Carrie

Holidaily Walkthrough with Carolee

Hi everyone! Today I'm going to show you the rest of my Holidaily album! You can see the first part of the album by going over to this blog post I made about it

IMG_6958.png

One of the things I really liked doing with this album is full size pictures. I never do these in bigger formats so it's fun to do them here., This was a day of festive coffee drinking for me: a nice cup of coffee in a festive teacup and a Christmas Tree frappuccino! 

This day, I chose to focus on the paper and add lots of snowy elements. We never get snow here in Los Angeles, but I thought this might be a nice day to do that with the bright lights of our lunch place. That burger was really good! I took some of the snowflakes from the die cut pack and added them along with some clusters of sequins to add a snowy look.

IMG_6961.png

This was another place where I wanted to let the picture take the show. It was a great photo of the room with many of my friends in the shot. For this, I just made a little cluster of decoration in the upper right corner with die cuts, paper scraps and some thickers I had in my stash.

IMG_6962.png

This page here is a bit of a weird one because I decided to add a different element to it. I made tags to bring to mind the tags on presents and added them into the notebook. Each of the tags has a picture of one of my dogs in their Christmas collars. On the other side is our stockings hung by the fireplace and a die cut letter to Santa!

This page is about the night out we had for my husband's birthday. We went to a local tiki bar and I had a picture of the amazing decor, so I made that the featured photo. For the left side, I punched green circles from the matching paper and layered them, along with more of those thickers, to decorate up that side.

IMG_6965.png

Next up was Christmas Day which I got to celebrate with lots of friends, including Andrea! Here's a picture of her and I together with the gift I got her. I added the Merry Christmas paper to the right and did a bit of journaling. Easy peasy and lets the photo take the focus.

IMG_6967.png

It's Boxing Day and some friends finally got us to go see Star Wars! With this one, the poster is such a strong red presence that I wanted to keep everything else really simple. Added the red ticket to the poster and a bit of paper to back the photo of our snack and it's good to go!

And finally here we are at New Year's Eve! I can't believe I finished the whole notebook! I hope you enjoyed this look through it. Until next time, happy crafting!

Holidaily Walkthrough with Enza

Hello everyone! Enza here, and today I'm going to share with you my completed Holidaily album! Yay! It's done! I think this is the first year I complete a December album. As I said in my previous posts, I have been working on two albums, one for my family in Italy, and one for us. It has been quite challenging to keep up, but I did it and I couldn't be happier with the way they turned out. 

I think one the reasons why I was successful this year was the simplicity of my process. One or two pictures and some journaling were all I needed to tell my full stories. You'll see some spreads with multiple pictures, but it is usually a collage or a combination of smaller photos. I also “limited” my stash to the Fairytale Club kits. What I love the most about the kits is that everything goes together. The colors match, there are tons of versatile embellishments, wood buttons, transparencies; the variety they offer is truly amazing. Occasionally you'll see some other supplies from my stash, used mostly to fill spaces or create layers.  

I decided to repeat some elements throughout the album to keep it cohesive: 

  • glitter card stock, used either as a background layer or to add extra sparkle here and there.
  • Tags, perfect for journaling or as a base for smaller photos. 
  • Vellum, on which I mostly typed my journaling.
  • Cut files and die cuts, to create more interest and bring in fun elements
  • Interactive pieces, such as the folded flap you'll see towards the end of the album.

For a more detailed description of the first part of the album, you can check out my previous posts here, and here. Now onto my completed Holidaily album!

Thank you for stopping by. Have an amazing day!
Enza


Holidaily Walkthroughs with Carrie and Kim

Carrie

Hello everybody!  Welcome to the flip through for my Holidaily so far!!  In this video, I share my pages for December 1-10.  Most of them are complete but a few still need either journaling or embellishments.  I tend to work on my daily albums pretty slowly lol ; ) Hope you enjoy and if you have any questions feel free to leave them in the comments.

Thanks for watching!
Carrie


Kim

I hope you all have had a joyous holiday season.  I'm doing my wrap up post on how I progressed with my Holidaily!

There isn't much new report from a finishing standpoint because I've done 3 blog posts about it.  If you haven't had an opportunity to see those progressions here are the links:

  1. https://andreabethke.com/fairytale-club-blog/2017/11/16/kims-advent-planner
  2. https://andreabethke.com/fairytale-club-blog/2017/12/16/holidaily-with-kim
  3. https://andreabethke.com/fairytale-club-blog/2017/12/21/holidaily-part-two-with-kim

But I did do a flip through of my entire faith journal/planner from the past three months which includes the whole month of December using just the JOLLY Kit

Thanks for tagging along with me on this Holidaily Project!

XOXOXO
-Kim

Teresa's Planner with Everyday Wishes

Hey guys! It’s Teresa, and I’m beyond happy with this months box! “Everyday Wishes” 
O-M-G it's amazing! 

image1.png

There’s so much girly cuteness! In full bright pastels! If that’s possible, and it is!

image2.png

This kit screams Cinderella! And I LOVE IT! And filled with unicorn wishes and ice cream dreams. 

image3.png

There are so many die cuts in the kit is crazy! Plus stickers! And so much more like...

Sparkly confetti! Yesss confetti, which you can do so many fun things with! 

image5.png

I hope y’all enjoy me sharing this kit “Everyday Wishes” 

My Wish Layout with Andrea

Hello there everyone! It is Andrea here and today I want to share with you a fun layout that I made using the new "Everyday Wishes" kit from The Fairytale Club!

01-My-Wish-Everyday-Wishes-LO-2017-01-13.jpg

Yay! I am so in love with this new kit/collection! All the happy imagery, like the unicorn and the princess and the rainbow and the castle and the little blue birds, makes me fill with hope and reminds me to wish on stars and to dream big! The Fairytale Club is all about believing in fairytales and happily ever after come true...and I think this kit in particular stands up as a perfect example of that! 

09-My-Wish-Everyday-Wishes-LO-2017-01-13.jpg

Since I am so in love with this kit, I was of course, really excited to start playing with it! I have been finding it very difficult lately to do any scrapbooking because of my health situation and how bad the pain has gotten. However, I still try to do a little bit of scrapping whenever I can and so the other day I decided to pull out the new kit and make a fun, quick layout!

07-My-Wish-Everyday-Wishes-LO-2017-01-13.jpg

I decided to use the new word die-cuts that come in the kit and make the phrase "my wish" for my title. The layout is about how my current wish is just to be healthy again and get back to a time when things were going better in that regard. So I used a picture from sometime in the summer of last year, 2017, right before things started going from bad to worse.  I have had to deal with poor health because of my CRPS condition, for a while now, however the last several months have definitely been much worse. Despite this fact though, I still find myself believing in all the beauty and possibility in life and that my wishes and dreams can and will still come true!

10-My-Wish-Everyday-Wishes-LO-2017-01-13.jpg

I layered several of the beautiful pattern papers behind my photo and to the top right of that I added a bow paperclip from the "happily ever after" version of the kit. On the bottom left, to balance things out, I added a cluster of goodies, such as my "wish list" ephemera piece and the yellow rose ephemera piece. I just adore the ephemera pack this month...it is so filled with lovely and magical die-cuts! And with those die-cuts, I also added a layered, 3-D butterfly which I created out of several of the pattern papers and one of the butterfly ephemera pieces. It came out super cute I think!

11-My-Wish-Everyday-Wishes-LO-2017-01-13.jpg

At the top of my layout, I added a little label from the cut-apart sheet which has a little quote about wishes on it...and to the side of my pic, I added another such label...this one with my wish on it..."I wish for good health". 

04-My-Wish-Everyday-Wishes-LO-2017-01-13.jpg

To finish things off, I added a couple of vintage buttons from my stash (and some white tulle from my stash) and one of the adorable flair buttons from the kit -- the one with the little rainbow heart!

08-My-Wish-Everyday-Wishes-LO-2017-01-13.jpg

Overall, I am really happy with how this layout came out and I hope you enjoy it too! If you haven't ordered your "Everyday Wishes" kit yet, get it today! It really is made of my wishes and dreams and I think you will find that it carries with it such happiness and hopefulness from me to you!