

Hey guys welcome back to the blog.. Hope your having a great summer so far.. Today we are working with the oh so cute “Tiki I Love You” kit. It is the perfect summer collection to create projects with.. I chose to make the popular memorydex cards that are floating all around social media. I love how these turned out and I hope u do too.. I used a lot of the ephemera peices from the collection as well as some of my favorite items from my stash.. All 3 cards are lined with a gold painters pen to give it a little pop.. We’ll that’s all guys for this post hope you guys pick this collection up and make some memory dex cards of your own.. TTYS!!!


Let's Relax with Kellie
Kellie here with you all again to share a project I made using the new Tiki, I love you kit, that is AMAZING! I have an album that I do monthly pocket pages for that is all about ME! I started this about 4 years ago when I noticed I had so many photos of my coffee, food, feet, books and everything else in between that never made it into the family album as I didn't want to take the stories away... So what's a girl to do?
This girl started an album just on ME! Haha. Started 6x8 moved to 9x12 and been in 9x12 since. I do one pocket a month and then if I feel like adding something in just because I do, because WHY now? So when I saw the Tiki, I love you kit, I knew instantly I wanted to have a pocket all about summer and the beach when I visited my bestie. Being winter here I needed a little sunshine.
I mean if you have read my blog posts before you know I have a real thing for the die cuts included in the kits from The Fairytale Club. Ugh I can't get enough of them. That camera, CUTE! I cut up some of the 12x12 pattern paper to 3x3 squares and that flower vellum.
Now I have a pocket just about summer and my trip to always look back on. Best of all it came together so easily.
Do you do an album just on yourself? If you've been thinking about it, just do it, you'll LOVE it!
Aimee's "Tiki, i love you" Embellishment Pocket Page
Aimee here, sharing a pocket page using the “Tiki, I love you” kit.

I love pocket pages. They are so fun and easy to make. I personally like using baseball card holder’s ones. They hold instax photos perfectly. Well the slots are larger than an instax, so the photo kinda just floats in it.

Here I have made a page without any photos. This is a first for me. But I thought this would be so cute in my album.

Let me tell you about my album real quick. I have an 8.5x11 album, that I use just for pocket pages. This is because I only make a few pocket pages a year. So, I have dividers in the book with the years on them. And when I make a pocket page I just pop it in the album chronologically. This is my very own version of “project life”. This page will get slipped into the summer of 2018, since that’s when this kit is from {really there are no rules}.

I filled the pockets with some of my favorite ephemera from the kit. I added some sequins to one of the pockets, die cuts and flair to the others. I fused them closed and then I stitched “Mermaids” on top of the pockets.

This is a really fun way to use all those extra bits and pieces!

Do you make pocket pages?
XOXO Aimee
Tiki, I Love You Shakers with Lilly

Hey guys welcome back to the blog. On today’s post I made some fun shakers using the “Tiki I Love You” collection.. I knew I had to use the butterfly and the hotel key when I first saw them in the kit. And how cute did they turn out? To display them I used the “By the beautiful Sea” paper .. I love how it looks.. To make the shakers themselves I just used some Becky Higgins pocket sheets and my fuse tool.. I think u can never go wrong with a cute shaker added in some happy mail :)


Summer Vacation, I Love You! with Laura
Hi everyone, it's Laura here again to share a Project Life layout I created using the Tiki, I Love You kit. I was inspired by all the wonderful other design team projects that have been made with this kit and I wanted to celebrate some of what I've been enjoying about summer before the season changes.
Although this kit is very tropical themed, there are plenty of elements that are perfect for documenting summer activities at home. For me that means spending time in the garden with my mom in the warm summer evenings.

To put together this layout, I first printed a large photo at 12x12". I love using large photos to create impact in my project life album and this one of my mom is an image I love of her. I pulled out the die cut pack and went to work creating a column of embellishments across the left side of the page. It only took a few minutes to adhere them down, add some enamel dots, and the layout was complete.

For the right side of the album I used a divided page protector and used elements from the kit to create custom pocket page cards. For the top left 4x6 card I cut down an A5 planner page, added a strip of patterned paper across the bottom, and some die cut words to complete the title.

I used a cut apart sheet to create a filler card featuring the adorable bird from this kit, Tiki. Don't be afraid to use embellishments that don't perfectly match the theme of your layout. There definitely aren't tropical birds in my yard, but it enhances the summer feel of the layout and I love the finished project.
I created my journaling card using some patterned paper, with card stock layered on top and finished the whole layout with a few more die cuts and enamel dots. I hope this project will inspire you to go create something summer-y with TIki, I Love You and celebrate whatever summer means to you.
Summer Love with Aimee

Aimee here, sharing a colorful layout using scraps.

Have you ever noticed the strips at the bottom of 12x12 papers? You know where the barcode is and the name of the paper. Some manufacturers even include a little sneak of the paper on the back side. Well, these are my favorite!
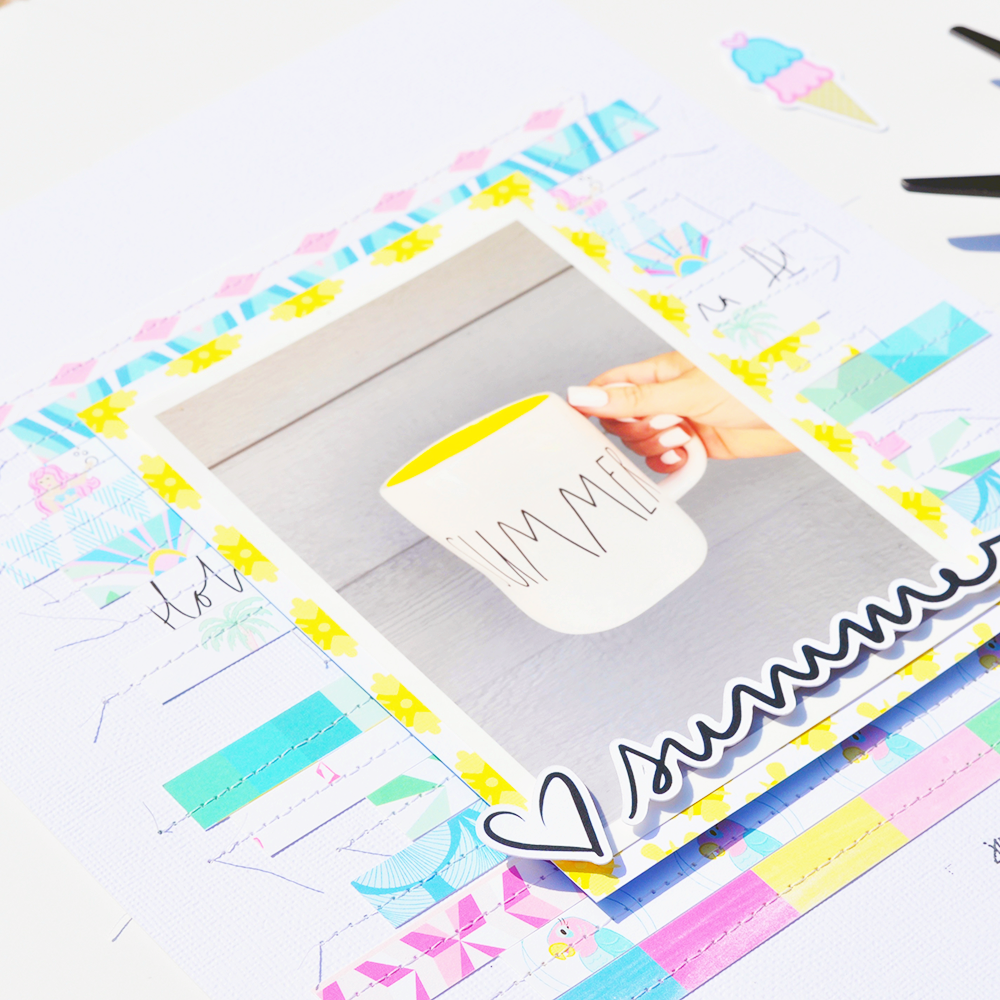
For this layout, I used almost ALL of those strips from the papers of the “Tiki, I love you” kit.
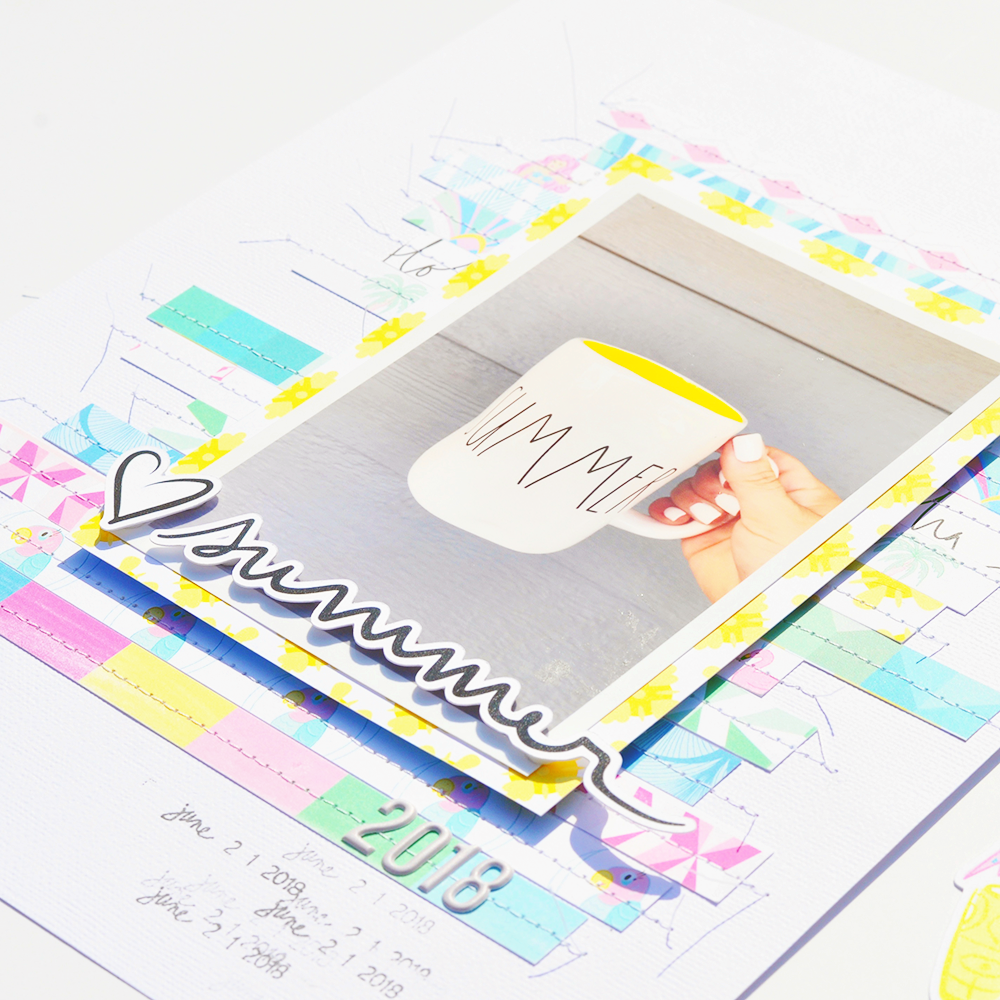
This is really the easiest thing! You just trim them off the 12x12 paper. Some of the papers have a design on both sides. So of course, you need to use both. But now that I have attached them all to my paper I can’t tell you the names of the paper {head plant into hand}.

After I had all the strips cut I placed them on my paper and staggered them. I adhered them and then stitched them on to my paper for added dimension.

I matted my 4x6 photo and then used foam adhesive to pop the photo off the page. I then used some tin foam adhesive to adhere the heart and word summer onto the photo.
I love how I was able to create my own background from something we typically throw away.
This is truly scrapbooking! Isn’t this an awesome idea to get another layout out and stretch your kit to the max!
Do you use these strips?
XOXO Aimee
Aloha with Carrie and Tiki, I Love You!

Hello Everybody! Today I have a hybrid layout to share using the Tiki, I Love You! Kit.

I started out with a 12x12 inch print from Costco using my photos and the digital Tiki, I Love You! Kit (formatted together in Photoshop). Since this layout is going into a 6x12 album I cut the print in half leaving two 6x12 inch photos.

The first thing I did was add yellow glitter glue (stickels) and glossy accents to all the Dole Whip sections of the photos. I really wanted the ice cream to pop off the page. Next, I used the Tiki tag die cut and sandwiched it together with a slightly larger piece of pale pink paper which I cut from one of the planner inserts. There is foam adhesive between the two. I added a bronze eyelet, a pale green gem, a blue heart puffy sticker, and used the gold thickers from Auburn Lane to spell out "TIKI". The size of the thickers fit almost perfectly with the TIKI text behind them. Then, I attached the tag directly onto some empty space in this photo.

To embellish the bird filler card all I did was layer some of the leaf die cuts with the happy flair and add a few gems. Super easy but cute!. For the 2x3 inch photo and 2x3 inch Aloha paper strip I added another of the die cut leaves plus the two heart die cuts. The pink and yellow one is from the die cut shapes pack, and the black and white one is from the word pack. I like how this cluster joins the photo and Aloha paper together.

For the photo below the bird filler card, I cut a thin strip of white with yellow pokadot paper from one of the planner inserts and popped it up at the top. The fan looking paper to the right I decided to layer with the green journaling spot from the cut apart sheet. I popped it up and added a thin border of the same pale pink paper cut from one of the planner inserts. I added the "Dole Whip" text using the same thickers from Auburn Lane (Pink Paislee) and placed a yellow gem in the center of the "O". At the bottom of the tag I layered a bunch of die cuts and added a blue puffy heart sticker from my stash. The arrow die cut that says "this way", I cut in half and tucked the "this" on the journal spot cluster. The "way" I popped up on edge of the photo on the opposite page. It still reads "this way", but now it points to the ice cream and you have to move your eyes across the page to see it. I always like it when I can add extra movement to my projects ; )

For the large photo on the opposite page I also added the "Aloha" word die cut off set with the yellow "Aloha" printed on the photo and popped it up using foam adhesive. There are three gems at the end of the die cut word for added sparkle.


At the top I added another thin strip of the polkadot paper and popped up the yellow cup die cut over the one printed on the page. To add a little more interest to the cup I placed a blue heart puffy sticker from my stash at the end of the straw.

And that's it for my hybrid layout! Thanks for taking a look!!! Have a lovely day! : ) Carrie
Laura's Summer Mini Album with the Tiki, I Love You! kit

Hi everyone, it's Laura here to share a few pages I put together for my summer mini album using the Tiki I Love You kit.

I decided to put together a mini album this summer to record some of the fun summer moments of the season. I'm using a personal sized planner and the planner pages from the kit make it so easy to pull together cute pages for the album.

I made this page about my and my partner's one year anniversary, which is at the end of July. We took some silly photos together that I edited into a photo strip in photoshop. I adhered one to the back of a planner page to make a mini layout, and put the other in a pocket I made out of the specialty vellum. The pocket also holds tags where we can each write a message about our anniversary. I used some pompom trim I had as a border to mini layout, added my journaling to the awesome palm tree planner page and the pages were done so quickly! I'm so happy to have some great pages documenting this special celebration.


Aimee's "Wonderful World of Disney" Memory Planner Spread!
Hey all, Aimee here to share a spread from my memory planner.

August is a special month for me, and especially this year. My husband’s birthday is August 5th, our 1 year wedding anniversary is August 10th and my 40th birthday is August 15th.

So I thought it was pretty important that I make a special planner spread! And when I saw this calendar layout in the WWOD Kit I just knew it was meant to be.

Now that I have the most important dates marked for this month, I can’t wait to see what other memories are made for me to cut and paste and add to this spread!

Do you have a month in your life that is flooded with wonderful things?

XOXO Aimee
Treat Filled Pillow Boxes with Carrie

Hello Everybody! Today I'm sharing some cute little treat boxes using the adorable Tiki, I Love You! Kit. This kit just screams summer to me so I knew that gifting some sweet summer treats to my friends and family was in order ; )

To start out I cut and assembled the little pillow boxes using various papers from the kit and the pillow box punch tool from We R Memory Keepers. The finished size is around 2 inches square from a 4x6 inch cut paper. There is only adhesive used in one strip for assembly, and I used red line tape so they'd be super strong.
This palm tree box design is tied up with blue and white bakers twine and a homemade tag. I have an old tag punch from Marvey (purchased at Michaels years ago) which I used as the base for all the tags. I also use mini blue eyelets on each tag. To embellish this one, the tag is punched from white paper with pink polka-dots (from the kit). The parrot and ice cream cone are from the sticker sheet and popped up using foam squares. The sun flair is layered on top, and I added a couple yellow gems on the ice cream cone to finish it off.

This retro fan design pillow box is tied up with pink and white bakers twine. The base of my tag is punched from a yellow section of one of the planner inserts. I popped up both the square flower and "I want to be a mermaid" pieces which were from one of the cut apart sheets. The sea shell flair is layered over the sea shell die cut and under the text strip. I added a yellow gem to dot the "i".

For this mermaid box, I used a section of pink from one of the planner inserts as the base of my tag. The "MER" tag is popped up using foam squares and layered over it. It's from one of the cut apart sheets. The larger pink heart and yellow sun are both from the die cut pack, and the smaller yellow and pink heart (which is also popped up) is from the sticker sheet. This time I used green gems and decorated the sun.

This pink diamond box is tied with the blue baker's twine, and the base of my tag is again a pink section punched from one of the planner inserts. The beach scene photo and "happy" banner are both from the die cut pack and popped up using foam squares. The watermelon is also popped up and from the sticker sheet. I added some of the green gems on this one too.

For this blue and white chevron box, I used the pink baker's twine and the polka dot paper as the base for my tag. The "relax" rectangle is from one of the cut apart sheets and the umbrella drink is from the die cut pack. They are both popped up. I layered the sea star flair under the drink and added yellow gems to embellish.

This pink flamingo box is tied up with the blue baker's twine. I used a yellow section from one of the planner inserts and my punch to make the base of the tag. The mermaid rectangle and "summer" banner are both from the die cut pack and popped up using foam squares. The little pink sea shell is from the sticker sheet and also popped up. This time I used the yellow gems to add some more bubbles.

This sky box is paper from the planner insert with the beach scene. I used the pink baker's twine and punched the polka dot paper as the base of my tag. The banana square is from one of the cut apart sheets and I popped it up using foam squares. The sunglasses and pink circle (which is layered under the mermaid flair) are both from the die cut pack. I kind of layered the flair under the bottom of the sunglasses to help give it a little lift. This time there's just one little yellow gem and I added it to the banana.

For this last little green diamond box used the pink baker's twine and the polka dot paper for my tag again. The yellow square with the "tiki, I love you" text on it as well as the butterfly are from the sticker sheet. The flower is from the die cut pack. They are all popped up using foam squares. To finish this one I added a green gem to the butterflies face.....and that's it. Here's one final photo with all of them together. Thanks for taking a look! Have a lovely day : ) Carrie
