Aimee's "Frame It" Layout

Hey everyone, it’s Aimee!

 Today I have an 8.5x11 layout for you!

frame it.jpg

 Do you ever have an idea for a layout and then you make and it doesn’t turn out how you thought? Well I do that ALL the time. But this layout I ended up LOVING.

2.jpg

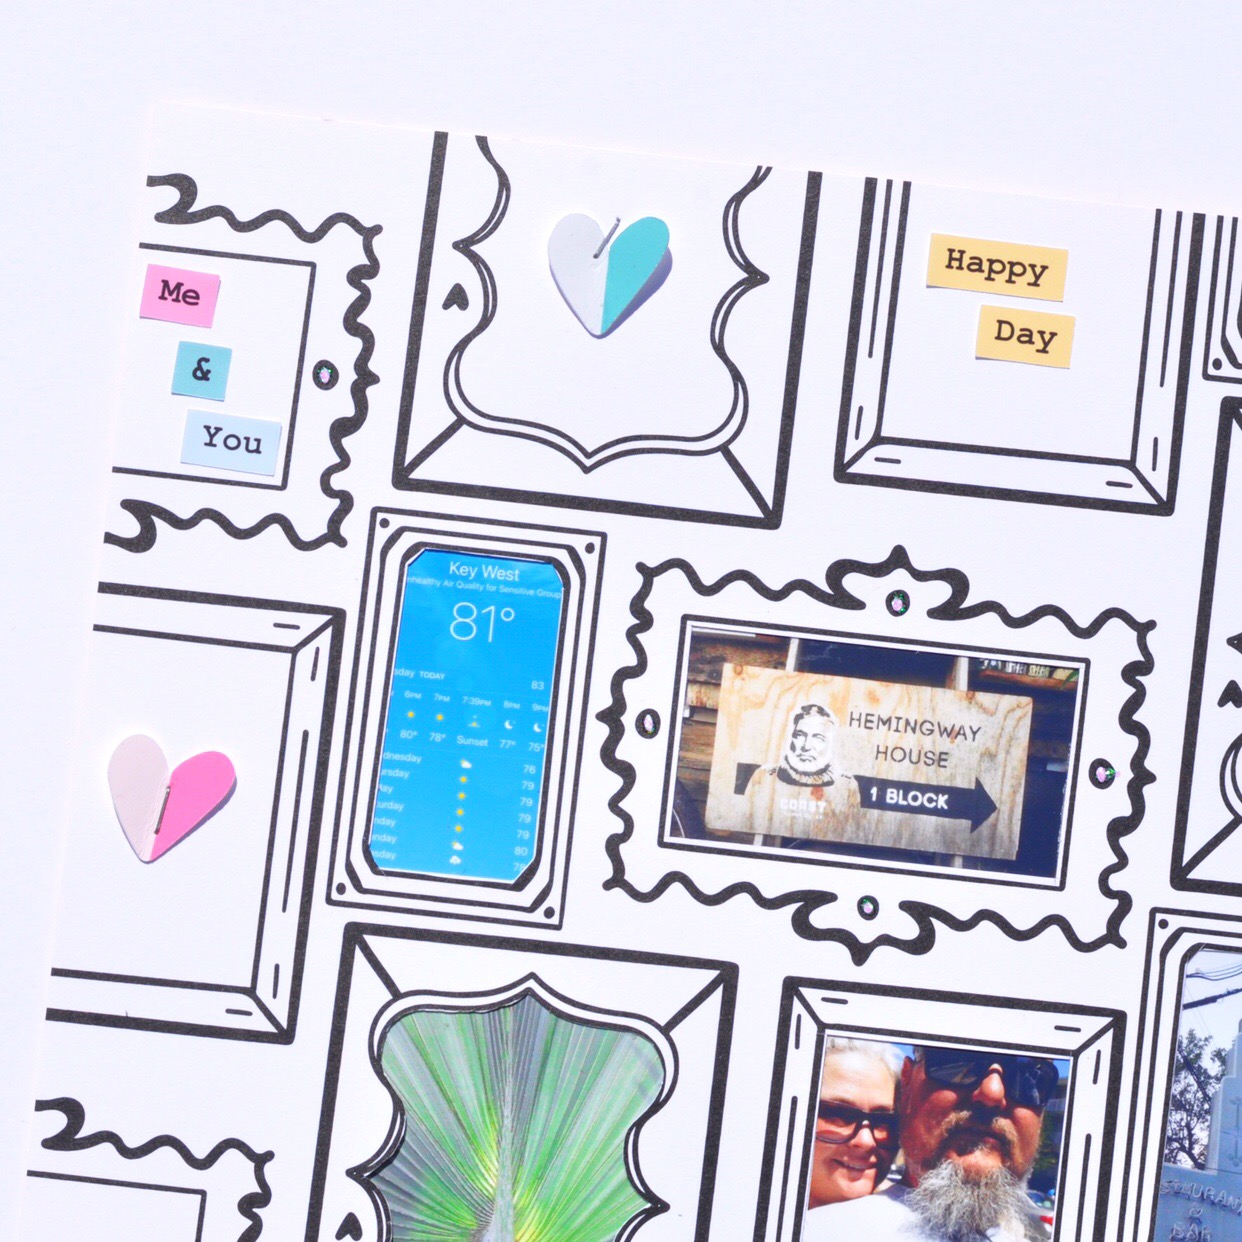
 When I started this layout that’s exactly what happened. I instantly knew when I saw the “Be True to You” 12x12 Paper, that I wanted to frame little photos in all the frames. And that’s exactly what I did.

3.jpg

 First, I cut the 12x12 paper down to 8.5x11 {that’s my go to size for layouts these days}. I then used an Xacto knife to cut out the frames that were still whole, so I could back them with photos.

 I measured and printed 7 little photos, and backed my paper with said photos. And the layout was moving right along just the way I wanted. But I knew it needed dimension. SO, I decided to use puffy alphas to write stuff in the frames, AND I just didn’t like it. Now what?

4.jpg

 I grabbed the Variety Pack and pulled out 4 of the color blocked hearts, and stapled them inside frames.

Ok now the layout is coming along, but I need more.

I am not a huge sticker user. I love them, I just don’t use them very often. I got the sticker sheet out and started putting the word strips and hearts and stars in the frames. And guess what.

 I LOVE IT.

I simply dated the layout with a date roller stamp and used some glitter glue on some of the frames.

5.jpg

 Now I was hoping you wouldn’t notice but I have to come clean. My paper is upside down.

Yep that’s right. See the squiggly frames? They have hearts in them and they are upside down. Oopsie! Once I noticed it was too late and I just went with it!

Have you ever noticed a boo boo in the middle of a layout and just kept going???

XOXO Aimee

Aimee's "Beautiful Dreamer" Mini

Hey FTC fans, it’s Aimee!

beautiful dreamer mini.jpg

Today I am sharing a mini tag album that is ALL about me!

ACS_0810.jpg

The Beautiful Dreamer Kit totally inspired me to make a little mini about me.

I mean it’s totally obvious why right??? She’s blonde and she sleeps, that describes me to the T.

3.jpg
4.jpg
5.jpg
6.jpg

 I started this album by cutting the 2, 12x12 papers with 3x4 pocket cards, “Make it Pink, Make it Blue” and “Nap Queen”.

7.jpg
ACS_0816.jpg
8.jpg

I then printed 8 photos of myself using my instax share printer.

9.jpg
10.jpg

I then choose 8 of the different cards that went best with my photos, and of course I used the tags too.

11.jpg
12.jpg

For my photos I used some Bookmark Tags from Pretty Little Studio {limited availability} as the base.

13.jpg
14.jpg
15.jpg

I embellished my photos and tags using die cuts from the variety pack and stickers from the sticker sheet.

16.jpg
17.jpg

I also labeled my photos with the date by printing on to white cardstock and cutting tiny strips.

18.jpg

I finished embellishing with my tiny stapler and other bits from my stash.

19.jpg

 I put all the tags and cards onto a painted binder ring and also used some charms and a tassel from my stash to give it more pop.

20.jpg

 I love that I finally made a little album just about me!

Do you ever make projects just about yourself???

XOXO Aimee

Kellie's "Beautiful Dreamer" Happy Mail Pocket

2019-08-02 12.02.26I wasn't lying!  Hi again crafty peeps, Kellie here with you again for another happy mail pocket only this time I've used the gorgeous kit, Beautiful Dreamer.  This kit, just stunning.
2019-08-02 12.02.26In case you missed this the first time, I followed the youtube video from the very creative @iamabsolutelyalice which was super duper simple to follow along with.⁠
2019-08-02 12.02.26The fun part about this is decorating back and front of the tags.
2019-08-02 12.02.26Again I'm so happy with the result and how these all came together.

Lilly's "Beautiful Dreamer" 3D Suitcase Project

Hey guys!!! Guess who’s back with a super fun 3D project share? :) Meee!!! Ok, ok, on with the good stuff.. (LOL) So when I received this collection I knew I had to make at least one 3D project with it, and here it is you guys ..

Tada!!! Isn’t it adorable?? It’s a functional suitcase that u can load up with goodies and send away to a pen pal.

I got the idea from Jenn on ytube.. Here is her tutorial if you want to make one yourself.

This collection is perfect for a project like this one, and I really hope this post inspires you to create one for one of your friends. It’s definitely easier than it looks, trust me.. I myself can’t wait to make some more :) Thank you guys for joining me on today’s post and I hope to see you guys soon.. Happy Crafting!!!

Water Color and Peonies with Aimee

It’s Aimee again! Today I got messy with the “Beautiful Dreamer” Kit and just had to share with you!

peonies_01.jpg

 I went way out of my comfort zone with this one! I mixed water colors with a fancy cut paper and machine stitching.

peonies_02.jpg

 I started this layout off by using a cut file from Kim Watson, you can find the file here.  I scaled down the file and cut it using the “Her Name is Aurora” 12x12 paper. You guys, this paper is so beautiful and the decision to cut it was so hard to make!

 I printed my photo to look like a polaroid picture.

peonies_03.jpg

 I marked where I was going to adhere my photo and I water colored around the outside of those marks.

Now, I really don’t know how to water color. I just moved some color and water on the paper and this is the final look! This is WAY out of my comfort zone.

peonies_04.jpg

 After it dried, I placed a heavy book on my paper and let it dry overnight {I don’t care for how the paper gets wavy after you have put paint/water on it - another reason why this is out of my comfort zone}

peonies_05.jpg

 I adhered my photo to my paper and then stitched around the photo several times.

I used some stickers from the sticker sheet to complement the photo, and then I placed my cut file over my photo, adhering it with 3-d foam adhesive.

peonies_06.jpg

 I also dated the layout with my date roller stamp

7.jpg

 How often do you leave your comfort zone when scrapping???

 XOXO Aimee

Kellie's Nap Queen Layout

TFC_KIRA_03
Hey there crafty people.  It's Kellie here with you again to share a mini layout in my pocket page notebook, using the NEW and gorgeous, Beautiful Dreamer kit.  I wanted to keep this rather simple to keep the focus on the photo and my daughters beautiful hair colour and this kit allowed for just that.
  TFC_KIRA_01For this layout I wanted to try something new, new to me.  There are so many amazing hearts in this kit and I LOVE that!  I decided to have three hearts on the pocket going down in a line, vellum in the front and the cardstock hearts backing them.
TFC_KIRA_01I then got out my old sewing machine and.................. the top one moved, ugh.  I didn't let it stop me and the other two hearts came out perfect.  The old, two out of three ain't bad.

The sticker, NAP QUEEN could not had been more perfect for this teen of mine.
TFC_KIRA_01
I decided to use the bottom strips of the 12 x 12 pattern papers as washi tape, they are truly perfect for that use.

Lilly's Handmade "Beautiful Dreamer" Cards

Welcome back to the blog, guys!!! Today I’m sharing some fun handmade cards I made using the “Beautiful Dreamer” collection.

I love how fun and bright these handmade cards look. That cute bird is one of my favorite elements from the collection.

What I usually do to make my hand made cards is use a 8.5 x 11 piece of 110lb cardstock, cut 5x7 cards, and decorate away. Add a little stitching and some cute layering, and you got yourself a card your crafty friend would love.

One of my crafty secrets is that when I don’t have much time to craft, I tend to make a cute card because they are fast and easy to make :) Thx for stopping by guys, catch you on my next post 💗

Aimee's "Eat Sleep Scrap Repeat" Layout

Hi everyone, it’s Aimee! It’s been awhile since I’ve posted. But I am so excited to be back and sharing this layout with you, using the brand new kit Beautiful Dreamer

So basically just scrap lifted this page from Paige Evans! I knew this cut file would look so awesome with the Beautiful Dreamer Kit!

To create this page, I started off using a cut file from Paige Evans. You can find the EAT SLEEP SCARP REPEAT cut file here.

I cut the it using plain white cardstock, I then used 7 different papers from the BD kit. Actually, I just used 4 different sheets that are double sided!

I separated the cut file and cut EER + LAT from “Spring Dream”, APE + SRA from “Her name is Aurora” TSP from” Beautiful Dreamer” and heart CE + EP from “Believe”.

 I backed the cut file and then placed all the letters inside the cut file. I then ran the whole cut file threw my sewing machine for a bit more dimension.

I used “Flora Fauna, and Merryweather” 12x12 as my base. I used 3-d foam adhesive to “POP” the cut file off the page. I used a border punch to punch the bottom of “Make it Pink, Make it Blue”.


I used a square instax photo for my layout. I layered it with a pink frame from the Variety pack, and used mini staples to secure it in place. I also layered the castle die-cut and a vellum butterfly die cut from the Variety pack over my photo. 

To finish off the layout I layered the blue bird and yellow butterfly from the Floral Emphemera kit under the cut file for dimension.

I love how the 12x12 “Flora Fauna, and Merryweather” paper helps give the layout depth and dimension with the faux paint and handwriting. It makes all the layers POP! 

Do you ever take advantage of the base papers design and incorporate it into your design? 

Thanks for stopping by, 

XOXO Aimee