Fairytale Christmas Workshop Special Event Kit, "Christmas-land," Full Reveal!!!

Hello there everyone! It’s Andrea here, and today I want to share with you the full reveal of our beautiful new specialty kit “Christmas-land,” which we have made special for our Fairytale Christmas Workshop to be held this Friday, the 21st (tickets still available)! It is such an amazing kit and just filled with the cutest, vintage-retro, Disney Christmas designs! I don’t know about you, but I love Disney, especially Disney at Christmas-time!!! There is so much Christmas-y goodness in this collection, and I can’t wait to show it all to you!

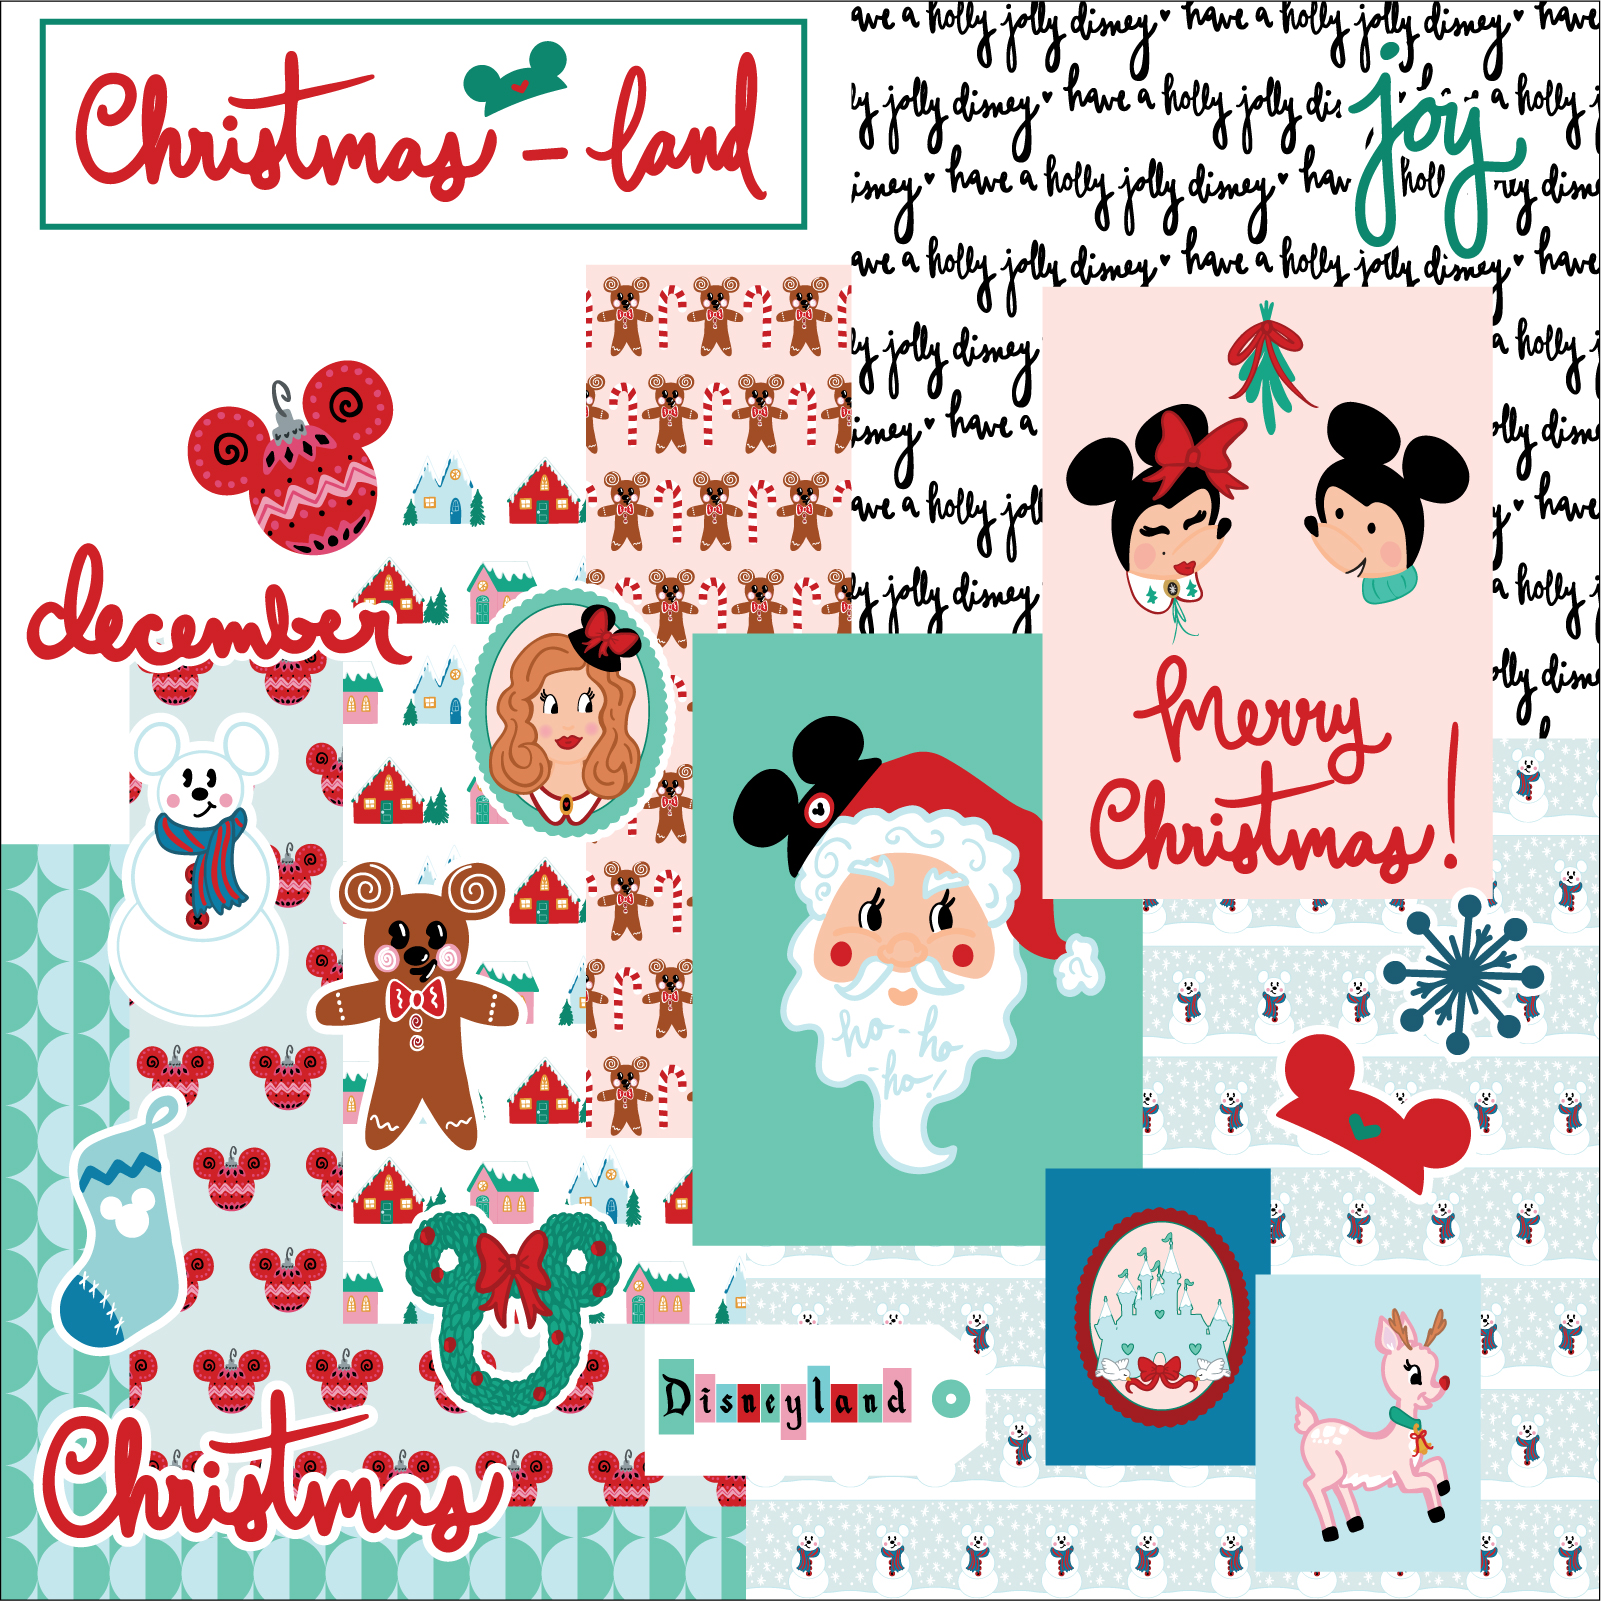
First, let’s talk about what the kit was inspired by and what it is all about. Whenever we have a special event, we do a special kit that is specifically made and themed for the event and the projects that goes with that event/class. In the past we have held our events at Disneyland, and, focusing on a particular Disney theme, they are always filled with Disney magic! For example, the theme for our most recent event was “The Wonderful World of Disney,” which was about vintage Disney and the opening of Disneyland in 1955. While this event isn’t happening at Disneyland, it is all about Disney at Christmas-time, and is therefore chock-full of that Disney magic! You’ll find loads of Christmas imagery but with a Disney spin, like our Mickey ears-wearing Santa, the Mickey ears wreath, our gingerbread mouse, and our festive Small World facade, just to name a few! For more examples, just below you can see a quick overview of the awesome embellishments in the kit (we’ll take a closer look later on)!

But first, let's take a look at all of the beautiful patterned papers in the kit. As you can see, the color scheme for this collection is composed of traditional Christmas reds and greens, combined with lovely pinks and blues, which reflects the colors you’ll actually see in the parks this time of year. This color scheme helps evoke the vintage-retro feeling I always get when I think about Disney, especially at Christmas-time.

This vintage-retro vibe especially comes through in the types of patterns in the collection, not just the colors. I love how the patterns came out in this collection. They are super duper cute! And oh so vintage Disney! Let’s talk about my favorites (it’s all of them). To start us off, we have the paper below, appropriately called, “Christmas-land." If you look closely on the front side, you’ll see the tops of the towers of the castle are covered in snow! I love that little detail! And on the back is an awesomely retro, geometric, tear-drop kind of pattern.

The next paper, cheekily titled “Do Ya Wanna Build a Snowmouse?”, is also one of my favorites (as I said earlier). Our little snowmouse on the front is so cute, don’t you think? And on the back is a Christmas stripe, perfect to use as a background for any of your Christmas projects.

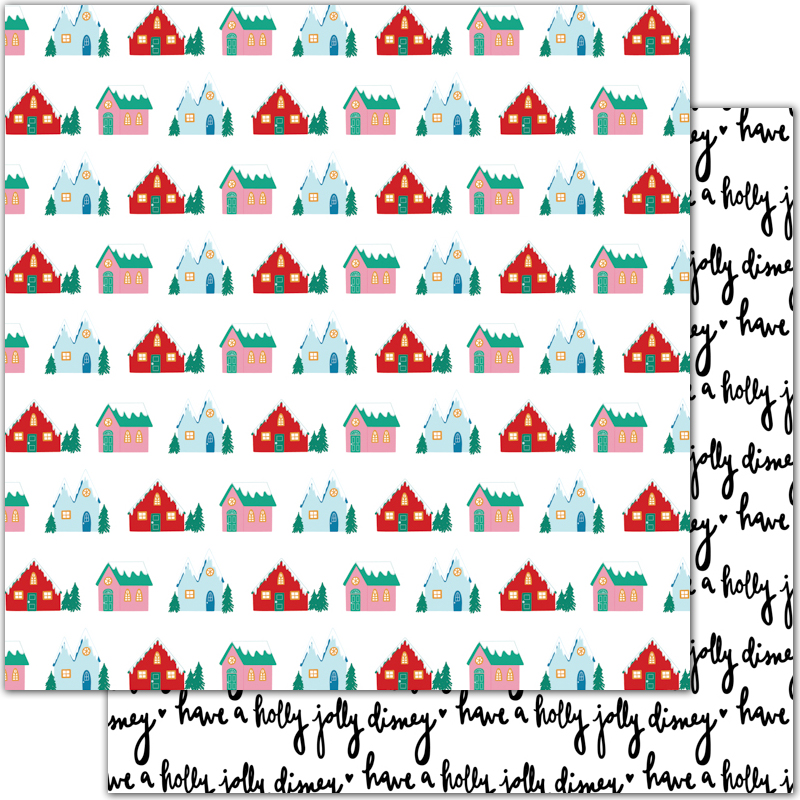
The next paper, called “Holly Jolly,” features rows of cute, snow-covered houses, which, I have to say, look extremely cozy and inviting on the inside. And on the back is a familiar, festive script with a Disney twist, reading “have a holly jolly Disney.” I just love it!

This next paper really is one of my favorite favorites! It’s aptly titled “Gingerbread Mouse,” and it features the absolutely cutest gingerbread creation you’ll ever see, flanked, of course, by delicious candy canes. And on the back is a simple black bow pattern, with a lovely soft blue background.

The next paper, called “Christmas Mouse Club,” is obviously another one of my top picks, and you know this is true because we brought back a pattern from our last Disney collection and gave it a Christmas colors update. I love how the whole thing pops now! And on the back is a really neat, retro, circle pattern.

We’ve had a bit of fun with the name for the next paper: “Under the Mouseletoe.” ;-) Our retro Minnie and Mickey are poised and ready to smooch under that famous little plant. And on the back we have a clean and simple mistletoe and Christmas bells pattern, very much like the kind of cute wrapping paper you’d find back in the day.

“Holiday Cheer” is the name of our next paper, and it features a cute, Mickey head ornament on the front. The back though, has to be one of my absolute favorite patterns from this collection. Those two, cute reindeer in pink and blue are obviously smitten with each other (you can tell by the heart hovering between them).

To wrap up our review of the papers in this collection, let’s take a look at the cut-aparts. There is the first one, called “Christmas at the Park,” and the second one, called “All I Want for Christmas is a Castle!” They are filled with fabulous vintage Christmas images like my cute, ginger, Mouseketeer girl, the Christmas tree with the mickey head ornaments, the Sleeping Beauty castle with the snow-covered towers, the Disney Christmas stocking, Small World for Christmas, and vintage-retro Mickey and Minnie of course! And they each have some really pretty vintage-retro patterns on the back of them as well!

Alright, now that we have looked at the pretty patterned papers in the collection, let’s take a look at the embellishments in “Christmas-land,” as promised earlier. This collection has a few really cute embellishments in it. one of which is the ephemera pack. It has some really amazing bits and pieces in it, like my cute little Mickey ears hats, Disney Christmas stockings, and cool script words like “santa” and “Merry Christmas.” And that’s just to name a few!

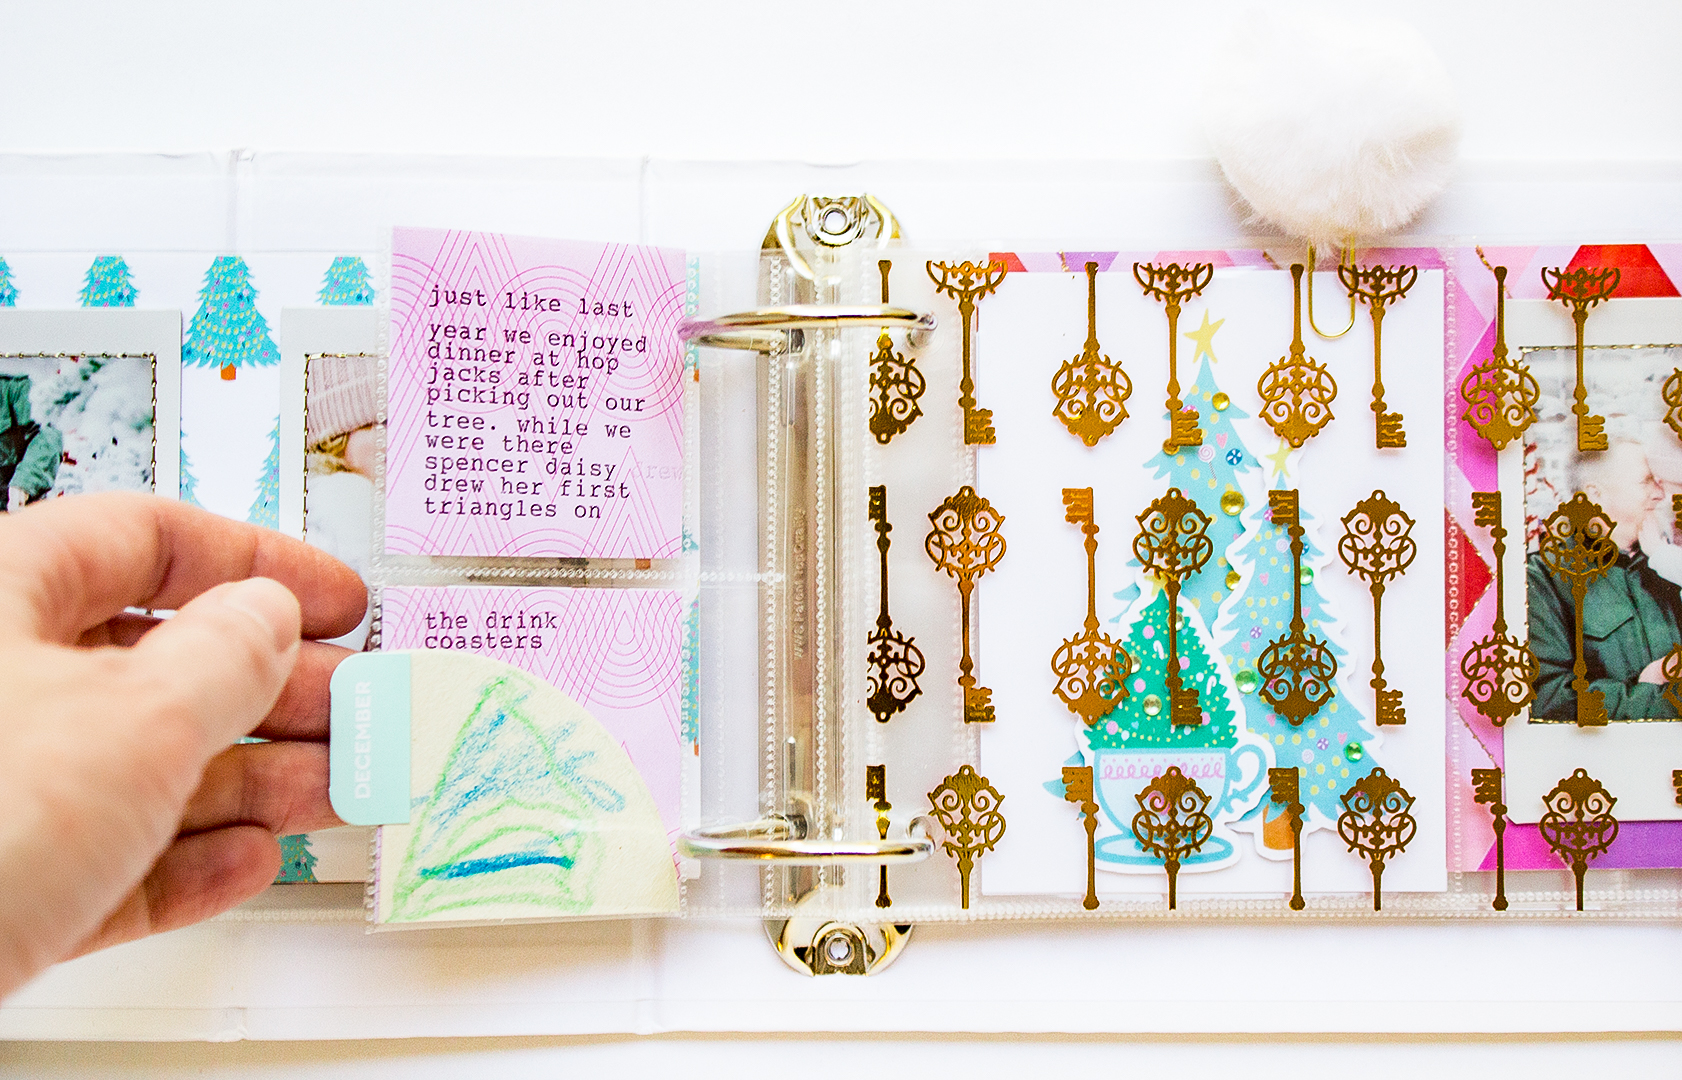
These decorative pom-pom paperclips are an embellishment we’ve started including in the past few kits. This pack is slightly different, though (I think for the better!), in that these pom poms are 1” instead of 1.5”, and you get six instead of four. They are great to use as a statement piece on your project or layout and absolutely perfect for planners, mini albums, and December daily’s to highlight or mark your spot on specific pages. I love how the pom pom colors work perfectly with the rest of the collection, and the gold paperclips are a very elegant finishing touch.

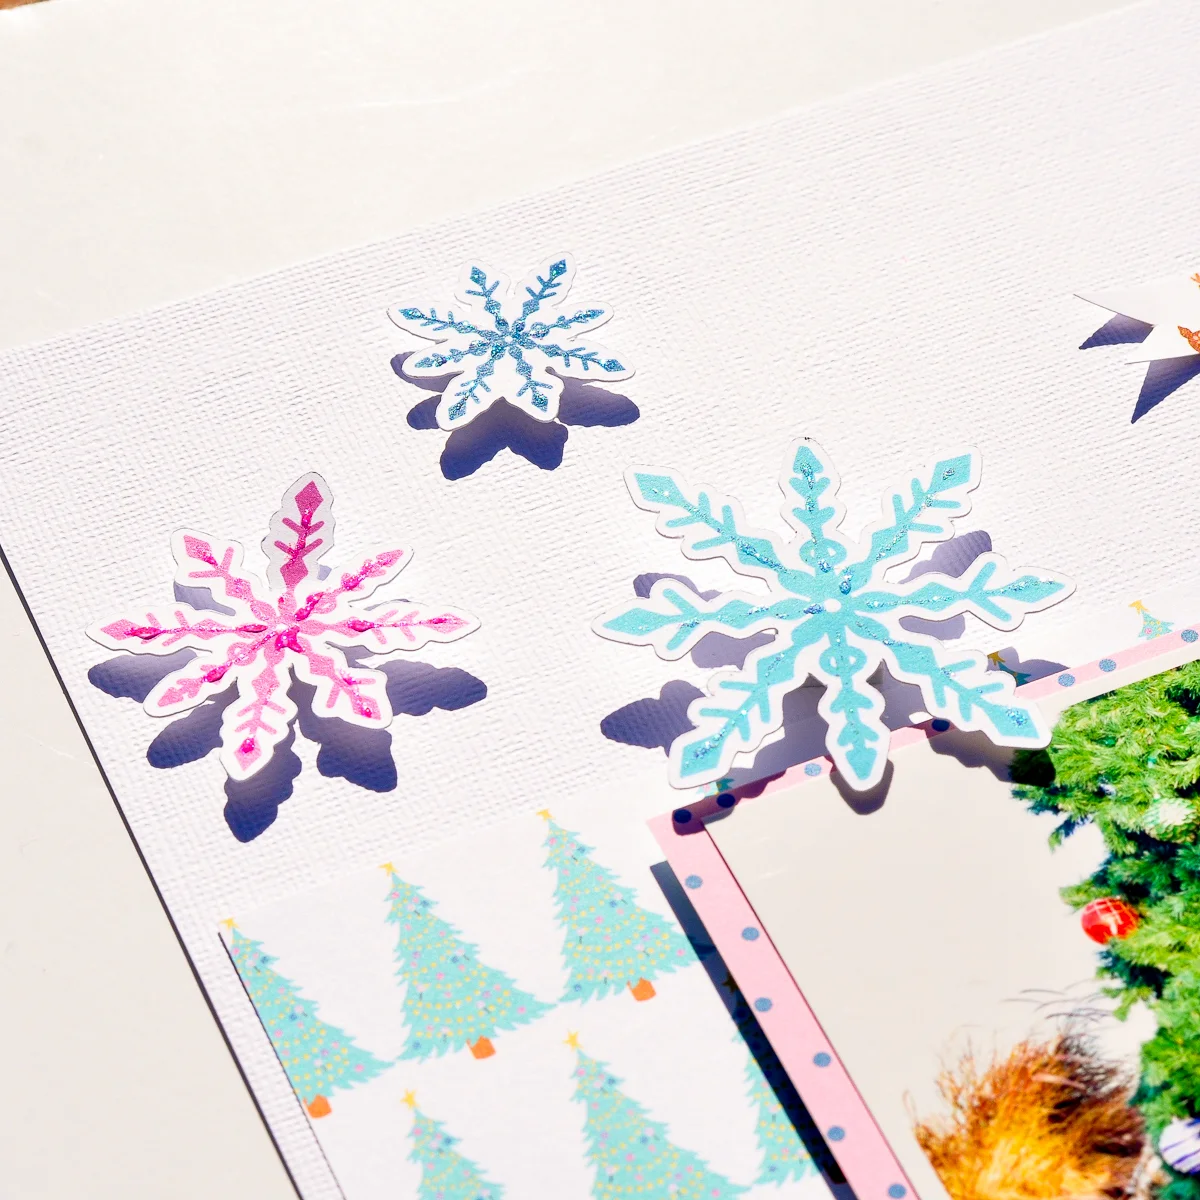
Here we have our final embellishment pack for this collection! It’s another one we started including in our kits very recently. The response was very positive, so we decided to do it again, especially since this kind of variety pack works well for the workshop this collection was designed for. But honestly, the bits and pieces you’re getting in this pack will work really well in any Christmas project you happen to be working on. You get six buttons, three glitter star stickers, ten bells in various sizes, and a very healthy amount of awesome Christmas sequins. Not to mention the library card and holder back there! I really love how this variety pack turned out!

And finally, let’s return to paper and talk about the gorgeous planner divider pages that come in “Christmas-land!” In addition to featuring many of the amazing graphics we’ve talked about already, there are three pages with one side dedicated to taking notes/making lists for Christmas and one page with a side containing a cute, December calendar!

Let’s take a look at each planner divider individually. We begin with one of my favorites, my cute snowmouse! He looks so dapper in that red and blue scarf! And I love the expression at the top, “It’s a marshmallow world in the winter!” And on the back is a lined page perfect for writing down your favorite memories from this holiday season.

9.jpg

On this next planner page, we return to the Small World facade design originally feature in “The Wonderful World of Disney” collection, only it’s been given a “paint job,” if you will, for the Christmas season! And there’s another lined page on the back for writing down your holiday traditions. Perfect!

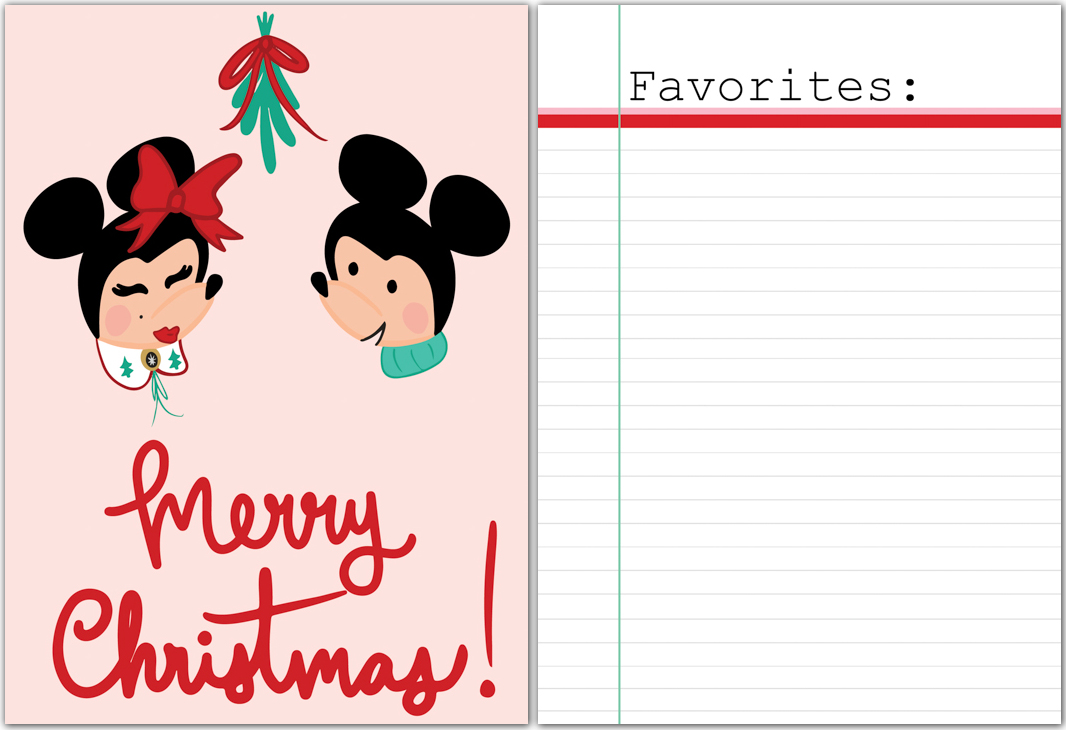
To finish up the series of lined note-taking dividers, we have this one meant to write down all your favorite things about this time of year. And on the front is that super-cute design of vintage Minnie and Mickey about to kiss under the mouseletoe, wishing you a “Merry Christmas!”

We continue with a divider featuring the Mickey ears Christmas wreath and a “Joy to the World” sentiment on the front, and that incredibly cute, blue reindeer design on the back. I just can’t get over the cuteness!

I love this phrase divider with the snow-covered Sleeping Beauty castle on the front. The sentiment on the back is a perfect encapsulation of what Christmas (especially a Disney Christmas) means to me.

Here we finally get to see the gingerbread mouse in all his glory! He’s just SO happy to see you! (Don’t tell him he’s about to get eaten all up!) And on the back is a collection of adorable, Christmas-themed Minnie ears. Speaking of which, don’t forget to order your Fairytale ears today (not just for Halloween or Christmas)!

6.jpg

This next planner divider is great because the sentiment on the back, “I love Disney at Christmas-time,” is pretty much the inspiration for the whole collection in one, simple sentence. And how cute is my redhead mouseketeer on the front? She’s so ready for Christmas!

Last but not least we have the planner page I mentioned earlier with the December calendar on the back. It’s great because it’s not pre-filled with any dates or years, so you can use it now, or you can save it for next year or the next or the next or…you get it. And of course, on the front we have my super-cute, psyched-for-Disney-Christmas Santa, sporting his mouseketeer hat on top of his Santa hat!!! Makes you wonder, is that hat just a part of his head at this point?

Alright, so that’s it for this reveal of the new “Christmas-land” collection. I hope you enjoyed it and are as excited about it and in love with it as I am! Of course we would love to see you at the class on Friday (you can still get tickets!), which includes this kit, but even if you can’t make it, you can still join the fun - the collection is up for sale now! Talk to you later everyone!

Hugs! — Andrea

Adeline's "December Dreams" Planner Setup

Hi my fairy friends,

It's Adeline today for the blog. So happy to be here again with you for the most beautiful time of the year with a Christmas planner project, using the "December Dreams" kit.

First I made my inside cover decor with so many cute things from the kit. I cut out a sheet of patterned paper, then I added ephemera and a ribbon of pom poms.

Then I slipped my paper into my cover to make a cute background, and I did the same with the gold keys acetate paper. I also added some die cuts to enhance this part of my set up.

Then I recycled the pretty packaging to not only decorate my cover but also to make a tag that I embellished with yarn and the silver glitter snowflake of the kit.

For the dashboard, I decided to create two parts: 1) the background which uses the swans paper (I am obsessed by them - they're so cute!), and 2) the layer just above that, which is the gold keys acetate paper.

I perforated my two sheets of paper and I inserted them in the planner. Then I decorated only the acetate paper with pieces of paper and die cuts.

In this kit, we also had pretty crystal snowflakes and charms in the Variety Pack, so I created a jewelry bookmark with string.

The last step was to put the pom pom paperclips on my pages.

I hope you like this set up! Enjoy the delights of Christmas!

Kiss from France,

Adeline

Project Life Instax Album - December Daily, with Aimee

Happy Saturday all, can you believe that there is only 9 days till Christmas. Wow!

This year for my December Daily, I’m using The Project Life, Instax Album. This is a fun size to use because you can use all different sizes of page protectors. The biggest bummer about this album, is that it’s a traditional album style, and there are no pockets for extra little trinkets like tags etc.

When I saw the Library Card Pocket form the “December Dreams” Kit, I just knew it was perfect for the inside of my album.

I used my typewriter to fill out the card, and it’s perfectly imperfect. Just like a library card would be. I choose myself as the author, cause I’m the one creating this book {look I totally messed up and put my name on the wrong line, did you even notice?}.

I choose the title of the book to be “December Daily 2018”. And for all the check-out days I but my name and date that I worked in the book. I love how I mixed it up with the red and black writing {you know, as if someone else was doing the checking out?}. I even forgot to capitalize the A on one of the lines.

7.JPG

I also made some tags to slip in my DD using die cuts and the sequin mix from the “December Dreams” Kit. I just used my Fuse tool, metal die cuts to trace. I placed the “ingredients” inside of the fuse sleeve and placed my metal die over making sure all the “ingredients” fit within the die cut, and just fused around it! Viola . . . some custom tags!

Are you using the “December Dreams” in your December Daily?

XOXO, Aimee

Kellie's 4x4 Mini-Layout with "December Dreams"

Hello everyone! It's Kellie here to share a mini layout I created in a 4x4 mini album. These little albums are the best for documenting your memories. They can be used for one theme or many. I decided to use one for just whatever I feel like at the time - no theme, no reason, just getting creative. Which is exactly what I did this month with the NEW December Dreams kit.

I made this wreath back in about 2012 or 2013... Pretty sure it was 2012. I randomly found the photo while looking for something the other month and kept it aside knowing I would use it with this kit!

If you haven't already, subscribe! Although it’s too late for your subscription to include the “December Dreams” kit, you can still purchase most of the separate components from this kit, and each time the kits keep getting better and better, so by subscribing now you won’t miss out on future kits. The acetate sheet that comes with the kit is gold on one side and a red on the back. I mean HOW awesome right!? I've used the red side here. I fiddled with the gold but it wasn't working, and then once I turned it over, the whole thing came together.

I then layered around the photo with the die-cut shapes ephemera pack and used one of the left over strips from the card I made and shared previously. I also used one of the little pom pom paper clips, they are so soft and fluffy. I grabbed a pocket that has 4 mini squares and cut up the 12x12 pattern papers and again used some of the die-cut shapes ephemera pack with a flair button. A quick little 4x4 in the album, just because. :)

6a017ee68bc9e8970d022ad37dc99f200c.jpg

Kellie's "December Dreams" Manufacturer's Strips Card

Kellie here with you to share a card I made with the strips along the bottom of each 12x12 patterned paper that comes with the December Dreams kit.  I did this last month with the Magical and Mischievous kit.  I'm planning to try and build a little card collection ready at hand when I need.  Best of all they are SUPER easy to make.

TFC_CARD_4

Always make sure to cut off those strips at the bottom - don't go throwing them away thinking you won't use them, because OH boy you will once you start!

TFC_CARD_1
Here is how I created this Christmas card. First of all I started with a base of white cardstock. Then I worked my way through the strips of off-cuts, as I mentioned, from the bottom of the 12x12 papers included with the December Dreams kit. Once laying them out and moving them around, and I was happy with the layout, I got out the ephemera packet that comes with every kit. 

TFC_CARD_2

Ephemera are my favourite thing to use and always the first thing I look through when my kit arrives.

TFC_CARD_3

Add on a flair from the kit and BAM you have yourself an easy, beautiful card!  See what I mean?  Super easy.  Give it a try!

-Kellie

The Fairytale Club presents... "Fairytale Christmas Workshop" with Andrea and Carolee

THE FAIRYTALE CLUB PRESENTS…

“FAIRYTALE CHRISTMAS WORKSHOP” WITH ANDREA AND CAROLEE


Hello there everyone! Today I want to share with you an exciting announcement! Are you ready?! Ok...I have a new class coming out for Christmas-time! And that is not all! In fact, it is a special Fairytale Christmas Workshop with not just one, but two classes, with a couple super fun and creative projects and lots of cool new tips, tricks, and techniques, taught by myself AND my dear friend, Carolee Flatley (Design Team Leader for The Fairytale Club and owner of One Crafty Potato)! Yaaaaaay! I'm so excited!

The workshop will take place in person, on Friday, December 21st, in Diamond Bar, California. There are two classes and 6 and a half hours of crafty/scrappy/planny/paper-loving fun, and there will be lots of beautiful and magical Christmas decorations, one of our amazing Fairytale Photo-booth set-ups, an awesome professional photographer who will be taking lots of cool pics of all attendees during the event (while you craft, at the photo booth, etc) which you will get and be able to print from an online gallery, yummy food and drinks, lots of cool prizes (everyone gets at least one), and, of course, an amazingly beautiful and super special kit that is made just for the event (sneak peek of the kit to be revealed later this week, but here is a clue...it's Christmas and it's Disney)!!! And pre-order for our super special Fairytale Christmas Workshop starts today, so that those of you who sign up now, for a limited time, can get the great early-bird special sale deal of 25% off!!!

So here is a run-down of all the details (including price, place, time, etc):

WHEN: Friday, December 21, 2018 - 2:30 pm - 9 pm

WHERE: 2029 Shaded Wood Rd., Walnut, CA 91789

EARLY BIRD SPECIAL PRICE: $75 (Price returns to normal $100 after this pre-order special)

Here's what we've got planned for everyone in attendance:

  • Two classes and 6 and a half hours of crafty/scrappy/planny/paper-loving fun

  • A crafty party with lots of beautiful and magical Christmas decorations

  • One of our amazing Fairytale Photo-booth set-ups and an awesome professional photographer who will be taking lots of cool pics of all attendees during the event (while you craft, at the photo booth, etc) which you will get and be able to print from an online gallery

  • Yummy food and drinks

  • Prizes!... such as adorable "fairytale ears" (decorative floral Minnie ears), scrapbook goodies, planner goodies and other cool Disney themed items. Everyone gets at least one prize...some people go home with several!

  • An amazingly beautiful and super special kit that is made just for the event (sneak peek below)!!!

Sign up now, don't delay! There are limited spots available! Celebrate the Holidays with The Fairytale Club Crew -- me and Carolee...and my hubby and partner in crime, Ryan, too -- as we create a special Christmas Crafting day just for you! It will be a Winter Wonderland of creativity filled with lots of magic, imagination, and fairytale fun!!! I'm so excited!!! I can't wait to see you there!!! Happy Holidays everyone!!!

01-December Planner 2017.jpg

Below are some pictures of a mini-album similar to the one we’ll be working on in this class, featuring some of the techniques you’ll be learning. A different Disney collection, exclusive to The Fairytale Club, will be used.

48-December Planner 2017.jpg

If this sounds fun to you, get your ticket now, on sale for a limited time!  There is limited availability, so if you want to make sure you have a spot, act now! Hope to see you at our event for a truly magical time!!!

--Andrea Bethke, Founder/Owner of The Fairytale Club

Xoxoxo!


Aimee's "December Dreams" Layout

Hi there, Aimee here! Hope you are having a wonderful Monday, lol. Today I’m sharing a layout using “December Dreams.”

12-3-18.jpg

While I was out of town for the Thanksgiving holiday, my husband and I drove around and found some fun places to take photos. We came across this half-decorated tree, and I was all, “husband STOP this is a perfect photo opp!”

So, with fashionable style we took photos with a half decorated tree with a tub full of ornaments behind us. I highly recommend learning how to use the timer on your camera and have a tripod handy. I took some pretty awesome photos this way.

Keeping it simple as always I used my go to 8.5 x 11 white cardstock for my base. I cut a piece of “Oh Christmas Tree” just smaller than my cardstock. I layered my photo on one of the A5 dashboards, and cut it down to mat my photo.

3.jpg

I used 3-d foam to pop my matted photo of the page. I fussed around with some die cuts and settled with the 3 snowflakes, the Nutcracker, Sugar Plum Fairy and of course the Christmas Tree.

I also used the printed strip at the bottom of the 12x12 sheet of “Oh Christmas Tree” to create the ribbon flag, and layered it with the “joy” flair.

Of course, I stamped my layout with the date the photo was taken {Date roller stamp from Heidi Swapp}.

2.jpg

And to take my layout to the next level I add sparkles to my die cuts. I dug into my old supplies and pulled my box of Stickles, I haven’t used these in ages. I love this extra sparkly touch!

I love this silly photo of my husband and I. Do you every stop at random places to take photos? Thanks for stopping by the blog today!

XOXO Aimee